Event Monster Premium
1.Download Plugin
- First, you download Event Monster Premium plugin.
- If you do not download yet (click here) to log in your account and download the plugin.
2.Install & Activate
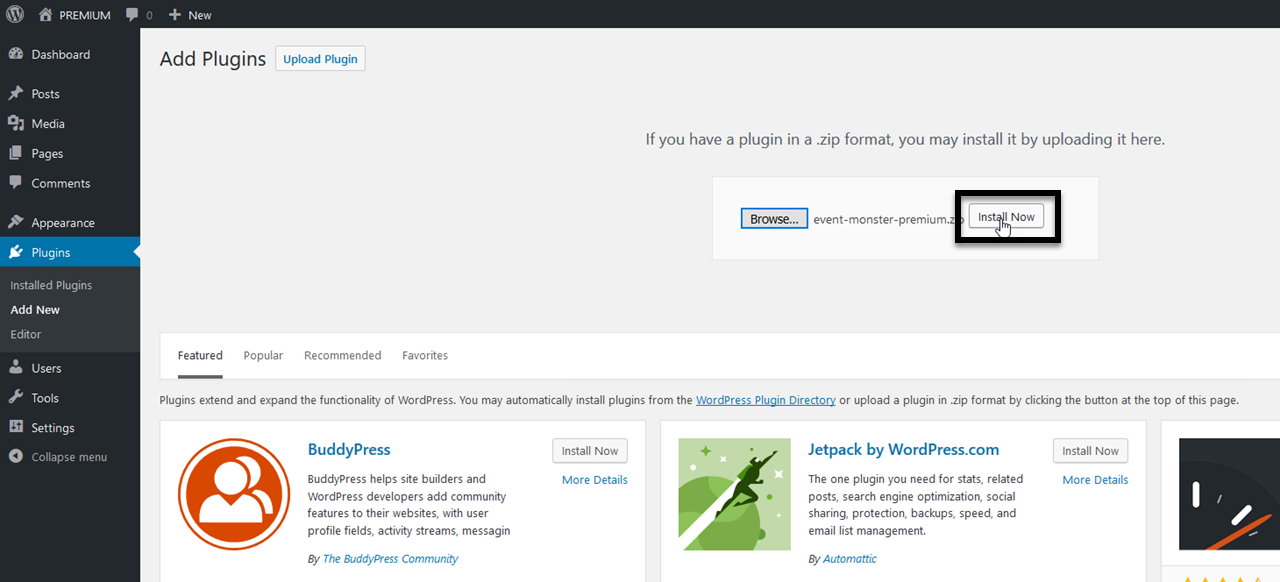
- If you got the zip file of Event Monster Premium plugin then go to the menu bar in admin panel and click on plugin > Add new.
- Then click on Upload Plugin button.
- Upload Event Monster Premium zip file of the plugin by clicking the Browse button.
- After upload Event Monster Premium plugin, click on the Install now button.
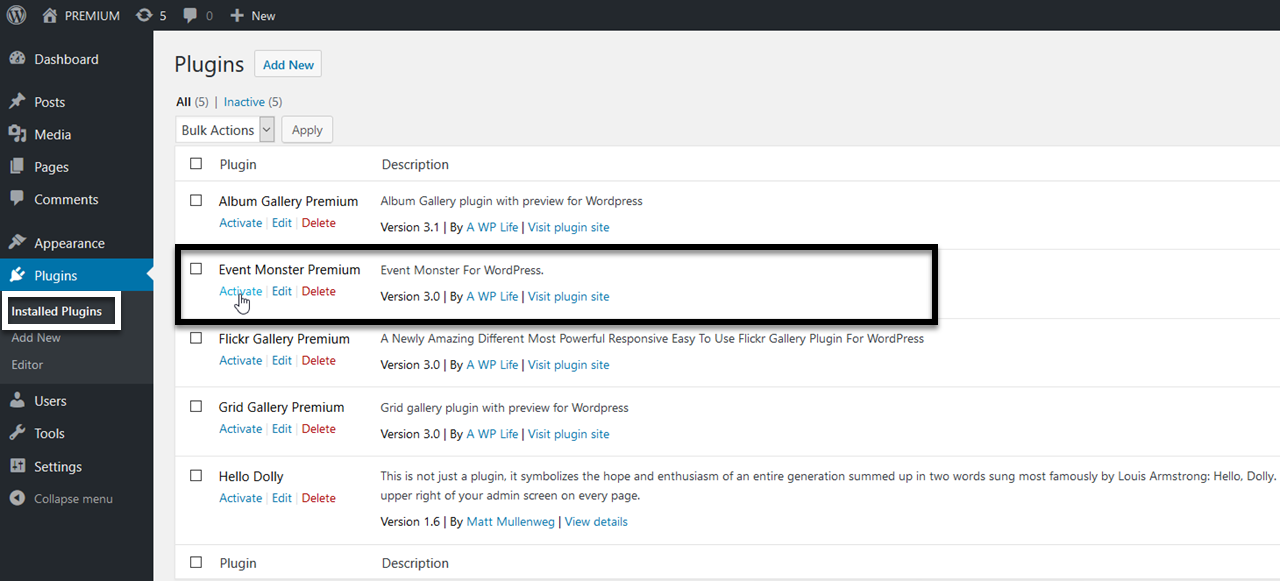
- Now activate your Event Monster Premium plugin “Or” go to admin menu bar and click on plugin > Installed Plugins.
- And activate the Event Monster Premium plugin.
Or
3.Tickets
Create Tickets
- Click on the ‘Tickets’ menu from the admin menu bar.
- Click on ‘Add Ticket’ button.
Then you will see a Popup box.
- Fill all fields and select status.
- Now click on ‘Create Ticket’ button.
A. Controls
- Eye Button – Click on eye button and you will see ‘View Ticket’ popup.
- Edit Button – Click on the edit button and you will see ‘Edit/Update Ticket’ popup.
- Trash Button – Click on trash button for delete an individual ticket.
B. Check
- Click on the checkbox for select or unselect a ticket for delete.
C. Fast Actions
- Click on ‘Check All’ button to select all tickets for delete.
- Click on ‘Delete All’ button for delete all selected tickets.
4.Coupons
Create coupons
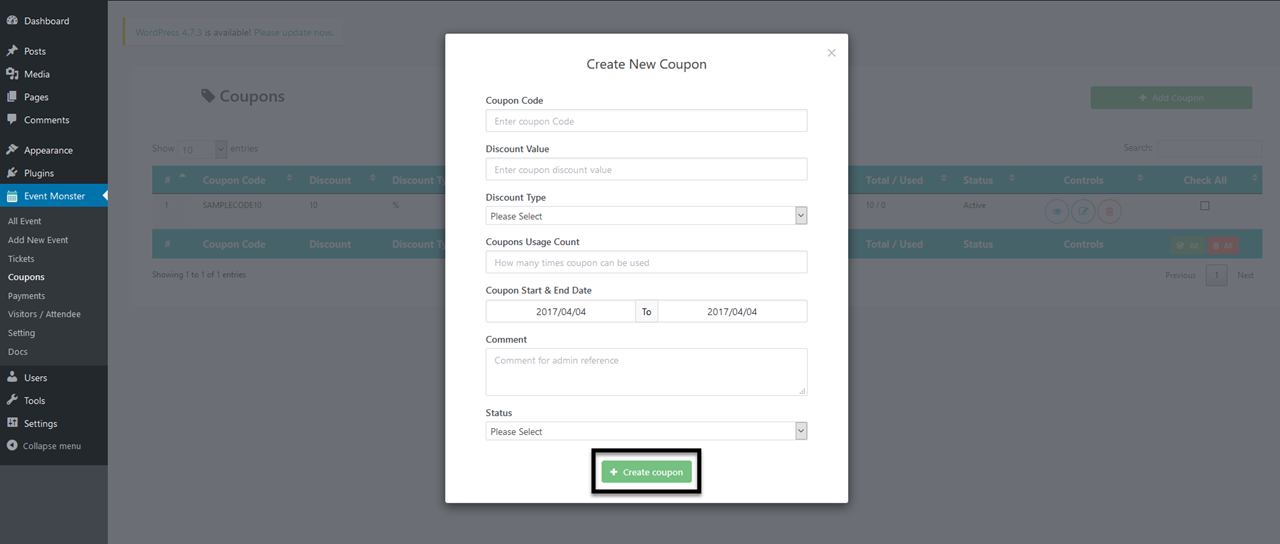
- Click on the ‘Coupons’ menu from the admin menu bar.
- Click on the ‘Add Coupon’ button.
Then you will see a Popup box.
- Fill all fields and select status.
- Now click on ‘Create Coupon’ button.
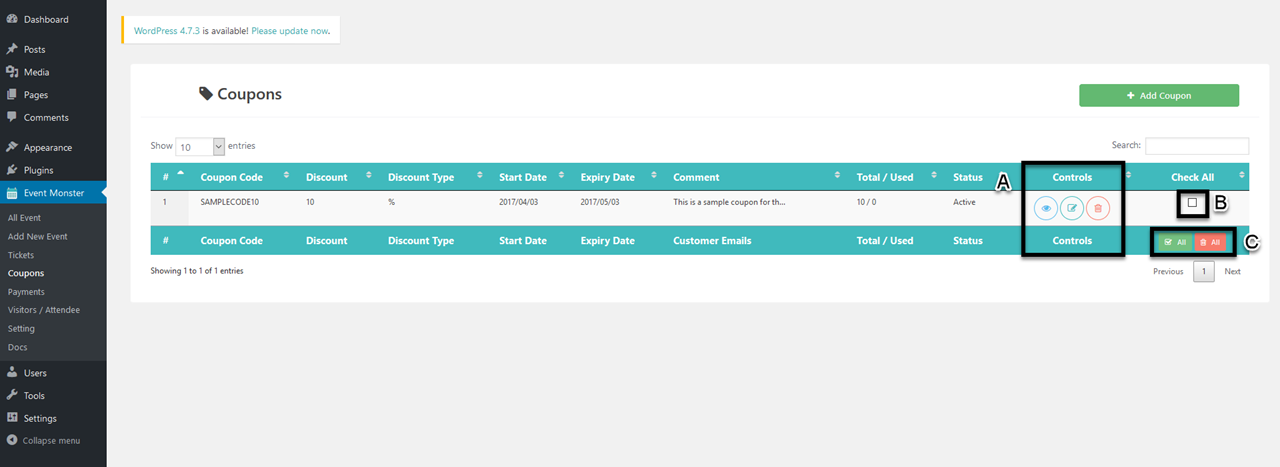
A. Controls
- Eye Button – Click on eye button and you will see ‘View Coupon’ popup.
- Edit Button – Click on the edit button and you will see ‘Edit/Update Coupon’ popup.
- Trash Button – Click on trash button for delete an individual coupon.
B. Check
- Click on the checkbox for select or unselect a coupon for delete.
C. Fast Actions
- Click on ‘Check All’ button for select all coupons for delete.
- Click on ‘Delete All’ button for delete all selected coupons.
5.Settings (Settings For All Events)
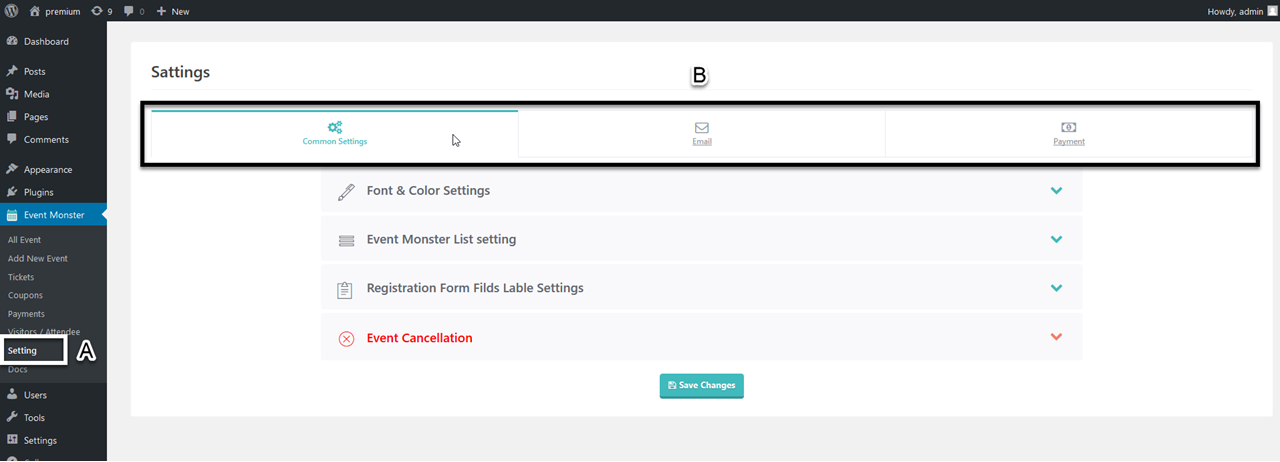
A. Click on the ‘Settings’ menu from the admin menu bar.
B. We have three tabs of settings.
1. Common Settings 2. Email 3. Payment
1. Common Settings
Font & color settings
- A. Set all events headings text/font size (in pixels).
- B. Set all events subheadings text/font size (in pixels).
- C. Set all events normal text size (in pixels).
- D. Set the background color of all events.
- E. Set the text color of all events.
Event Monster List setting
- A. Set the background color of date for event list.
- B. Set date color for event list.
- C. Set pagination ON / OFF for event list.
- D. Set hover effect for event list.
- E. Set color of hover effect for event list.
Registration Form Fields Label Settings
- A. Set heading of the registration form.
- B. Set sub-heading of the registration form.
- C. Set “First Name” field text of registration form for all events.
- D. Set “Last Name” field text of registration form for all events.
- E. Set “Email” field text of registration form for all events.
- F. Set “Phone” field text of registration form for all events.
- G. Set message for a successful booking.
- H. Set message for booking full (all ticket sold).
2. Email
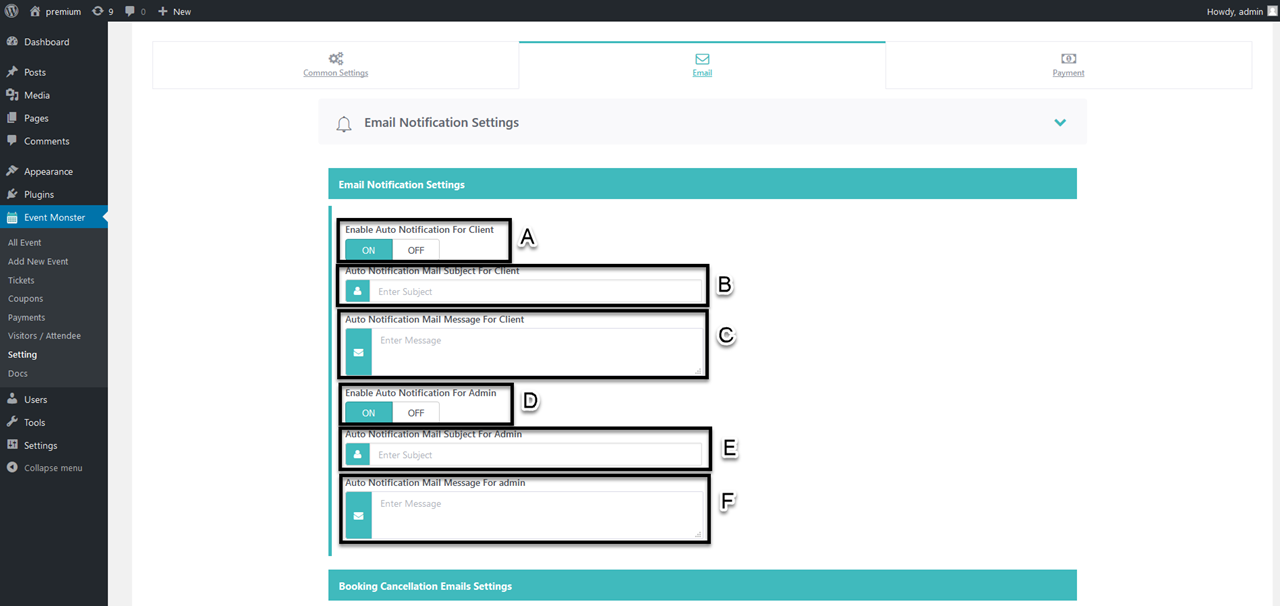
Booking Notification Emails
- A. Set On / Off auto-notification email for the client.
- B. Type email subject for the auto notification email.
- C. Type an email message for the auto notification email.
- D. Set On / Off auto-notification email for the admin.
- E. Type email subject for the auto notification email.
- F. Type an email message for the auto notification email.
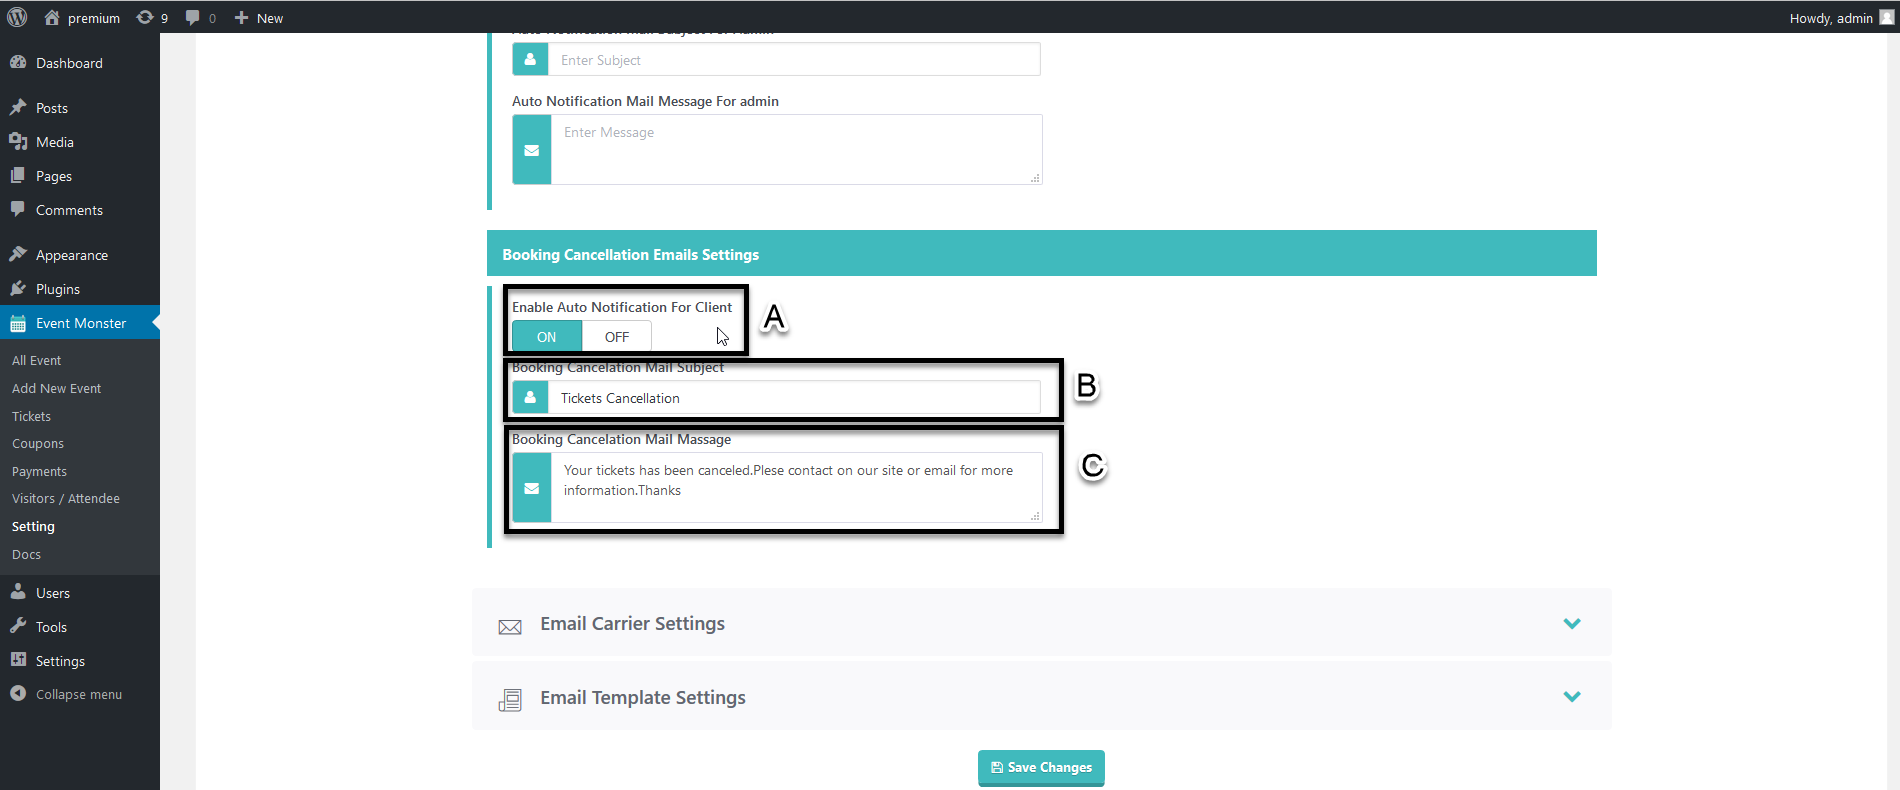
Booking Cancellation Emails
- A. Set On / Off auto notification of booking cancellation email for the client.
- B. Type email subject for the booking cancellation of auto-notification email.
- C. Type an email message for the booking cancellation of auto-notification email.
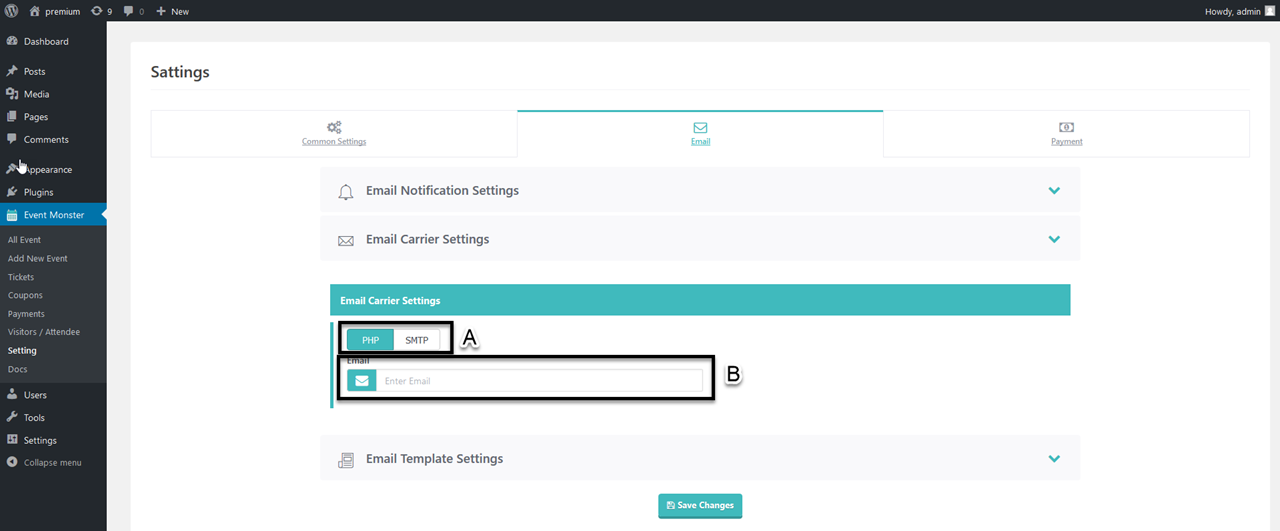
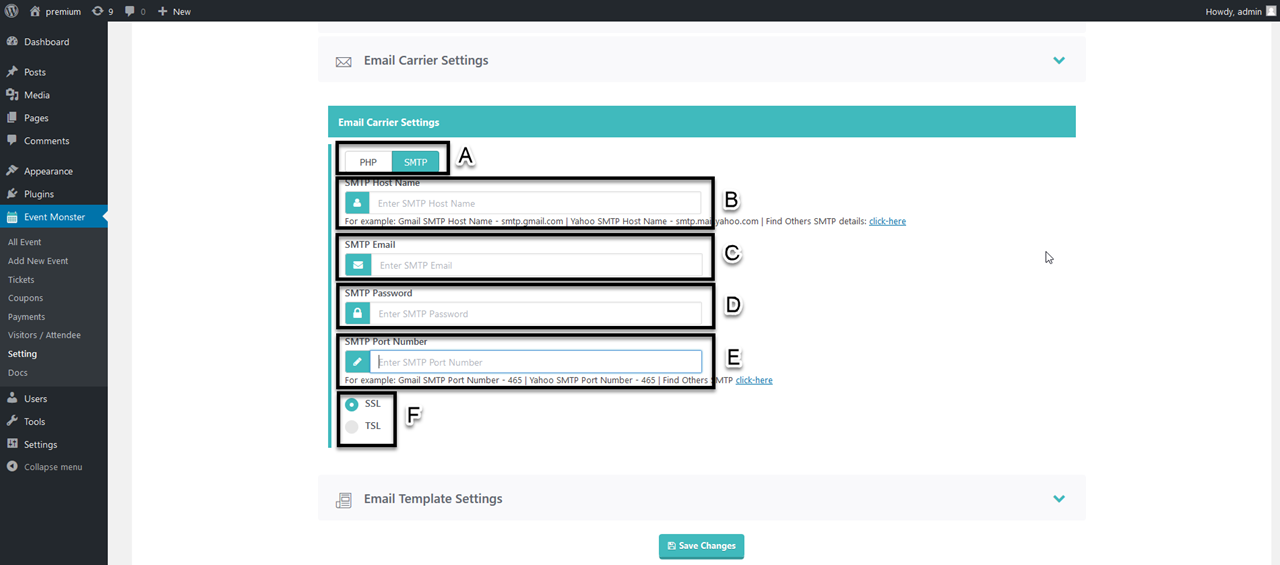
Email Carrier
- A. Select email carrier for notification email.
- B. If select PHP email carrier then type your email address.
Or
- A. If select SMTP email carrier
- B. Type SMTP hostname like “smtp.gmail.com” or “smtp.mail.yahoo.com”.
- C. Type your email address.
- D. Type your password.
- E. Type SMTP port number like Gmail and yahoo SMTP port number – “465”.
- F. Select SMTP type – “SSL” or “TSL”.
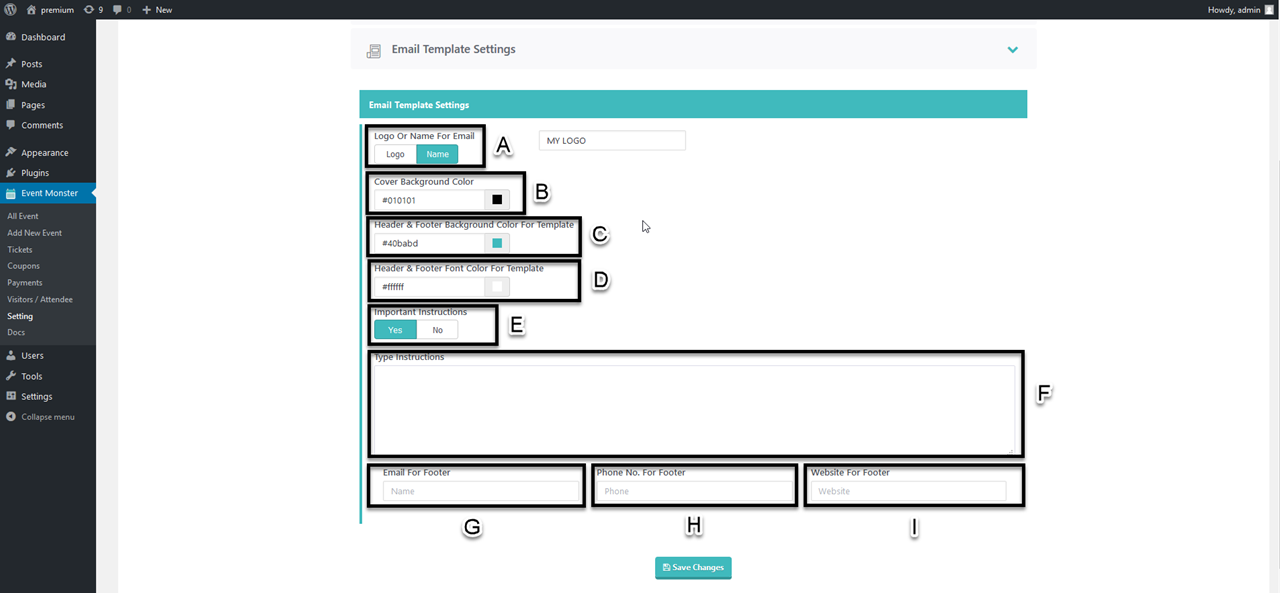
Notification Email Template Settings
- A. Set “Logo” or “Name” For email template header.
- B. Set background color for the email template.
- C. Set header and footer color for the email template.
- D. Set header and footer text/font color for the email template.
- E. Set “Yes” or “No” important instructions in the email template.
- F. Type instructions.
- G. Type email for inquiry it will show in the footer of the email template.
- H. Type phone for inquiry it will show in the footer of the email template.
- I. Type website it will show in the footer of the email template.
3. Payment
- A. Select the payment mode.
- B. Select currency.
- C. Type PayPal email id.
- D. After set all settings of the settings page, then click on “Save Changes” Button, you all settings will be saved.
6.Create Event
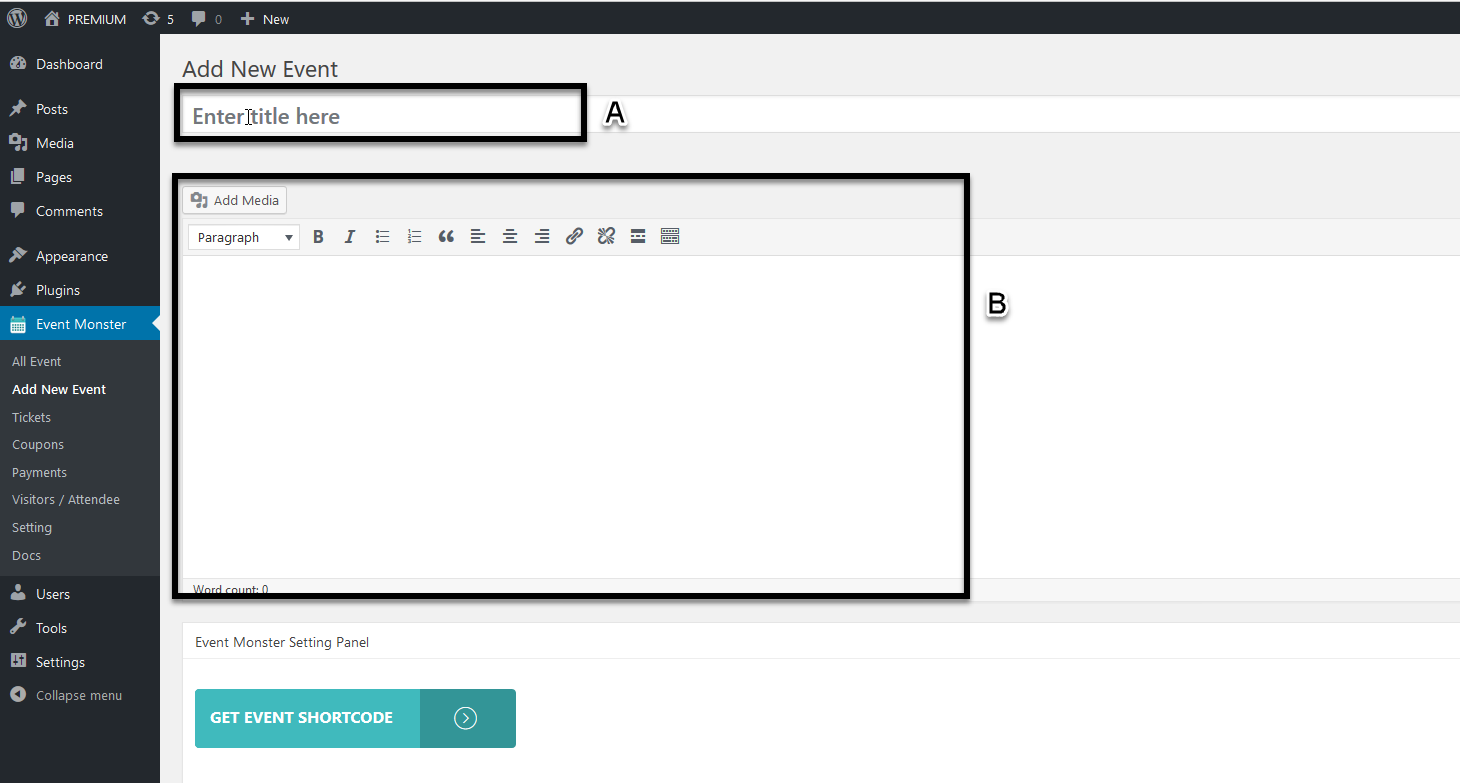
- For create Event click on Event Monster Premium in the admin menu bar.
- Then click on Add New Event.
- A. Then type Event title, in the text box.
- B. And type Event description in The content box.
- A. Publish your event with the default setting.
- B. Click on “GET EVENT SHORTCODE ” button.
- Now copy the shortcode, and paste where you want to show the Event any Page or post.
- A. Copy ” [EM] ” if you wanna show multi-event or event list in the single page.
- B. Copy ” [EM id=31] ” if you wanna show single event single page.
7.Configure Event Settings
You can set 3 Different types of banner
- Image Or 2. Video Or 3. icon
1. Banner image –
- A. Upload a banner image for the event.
- B. Set Banner size Fixed or Custom.
- C. Set border On banner image.
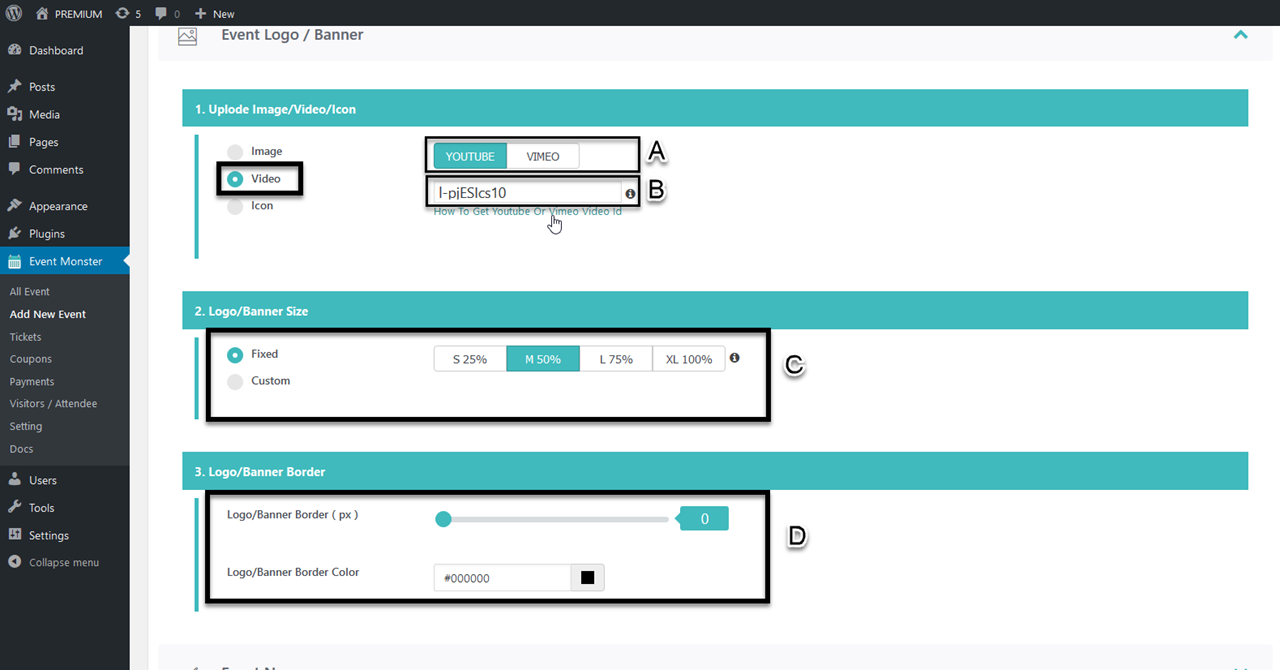
2. Banner video –
- A. Select the video site “Youtube” or “Vimeo”.
- B. Type Video Id – How To Get Youtube or Vimeo video id.
- C. Set Banner video size Fixed or Custom.
- Set border On banner video.
3. Banner icon-
- A. Select an icon for event banner.
- B. Set icon size in pixels.
- C. Set icon color.
- D. Set icon background color.
- E. Set border On banner icon.
Set Event title Settings
- A. Set event title font size.
- B. Set event title color.
- C. Set event title alignment.
Set Event Details Settings
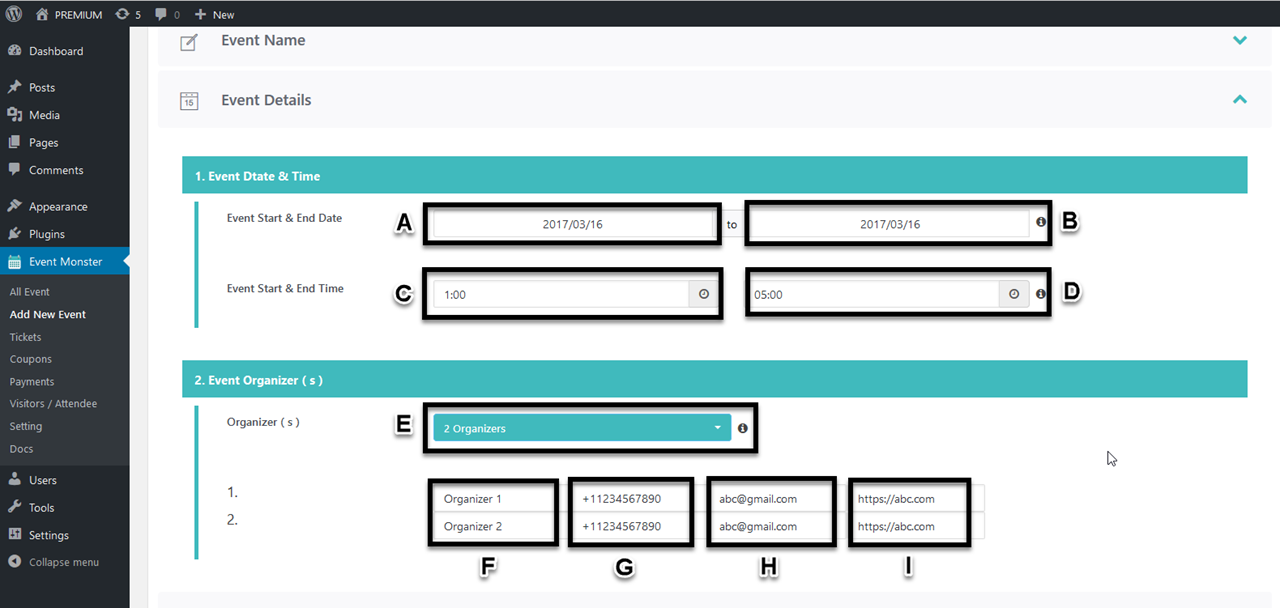
- A. Set event start date.
- B. Set event end date.
- C. Set event start time.
- D. Set event end time.
- E. Set organizers – how many want to show on the event.
- F. Name of the organizer.
- G. Phone number of the organizer.
- H. Email of the organizer.
- I. Website of the organizer.
Set Event Countdown Settings
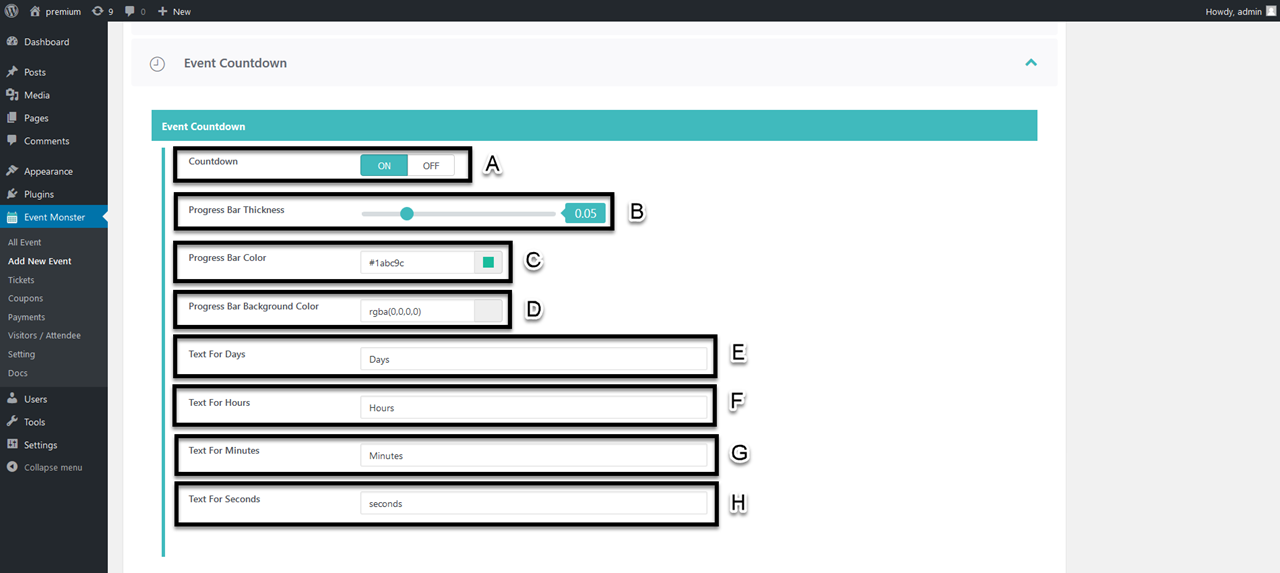
- A. Set event countdown On / off for the event.
- B. Set progress-bar thickness for the countdown.
- C. Set progress-bar color for the countdown.
- D. Set progress-bar background color for the countdown.
- E. Set text for days.
- F. Set text for hours.
- G. Set text for minutes.
- H. Set text for seconds.
Set Event Venue Settings
- A. Type event address.
- B. A contact number for help.
- C. An email address for contact via email.
Google Map Settings
- A. Set Google map On / off for the event.
- B. Type Google map embed Url – How To Get Gool Map Embed URL.
- C. Set Google map Height.
- D. Set Google map opacity.
Gallery Settings
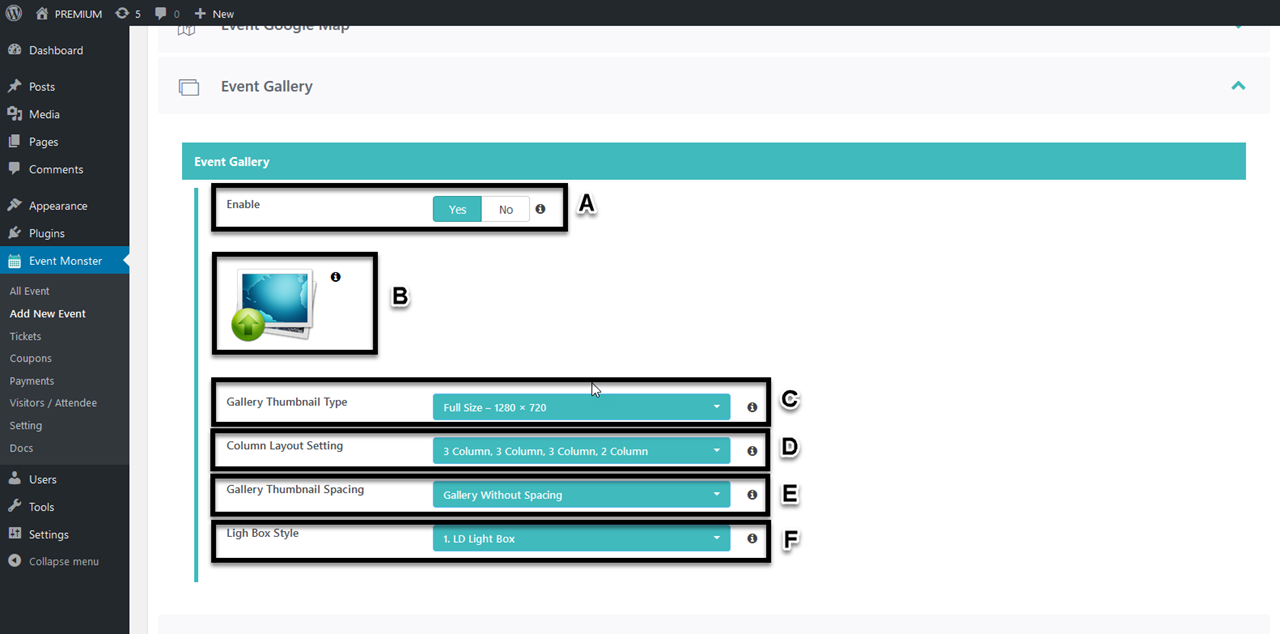
- A. Select “Yes” if you wanna show gallery on the event.
- B. Click on image icon for uploading images.
- C. Set gallery image quality type.
- D. Set Columns For gallery.
- E. Select spacing or without spacing between gallery images.
- F. Select lightbox or no lightbox for gallery view.
Accept Registration Settings
- A. Select “Yes” if you wanna allow registration or booking on the event.
- B. Select external or internal registration type, If you select external registration type then you can set registration page link only.
- If you select internal registration type, then you can use internal registration settings.
- C. Set max quantity of tickets.
- D. Set max range of tickets for per client.
- E. Check the checkbox which ticket you want to use for registration.
- F. Type registration button text if you want to change.
- G. Select button type.
- H. Select button color.
- I. Select registration button alignment.
Sponsors Settings
- A. Select “Yes” if you wanna sponsors images on the event.
- B. Click on image icon for uploading images.
- C. Select sponsor site open link in the same tab or in the new tab.
Social Share Buttons Settings
- A. Select “Yes” if you wanna social share buttons on the event.
- B. Type “ShareThis” Script and code – How To Get Social Share Button Code.
Custom CSS
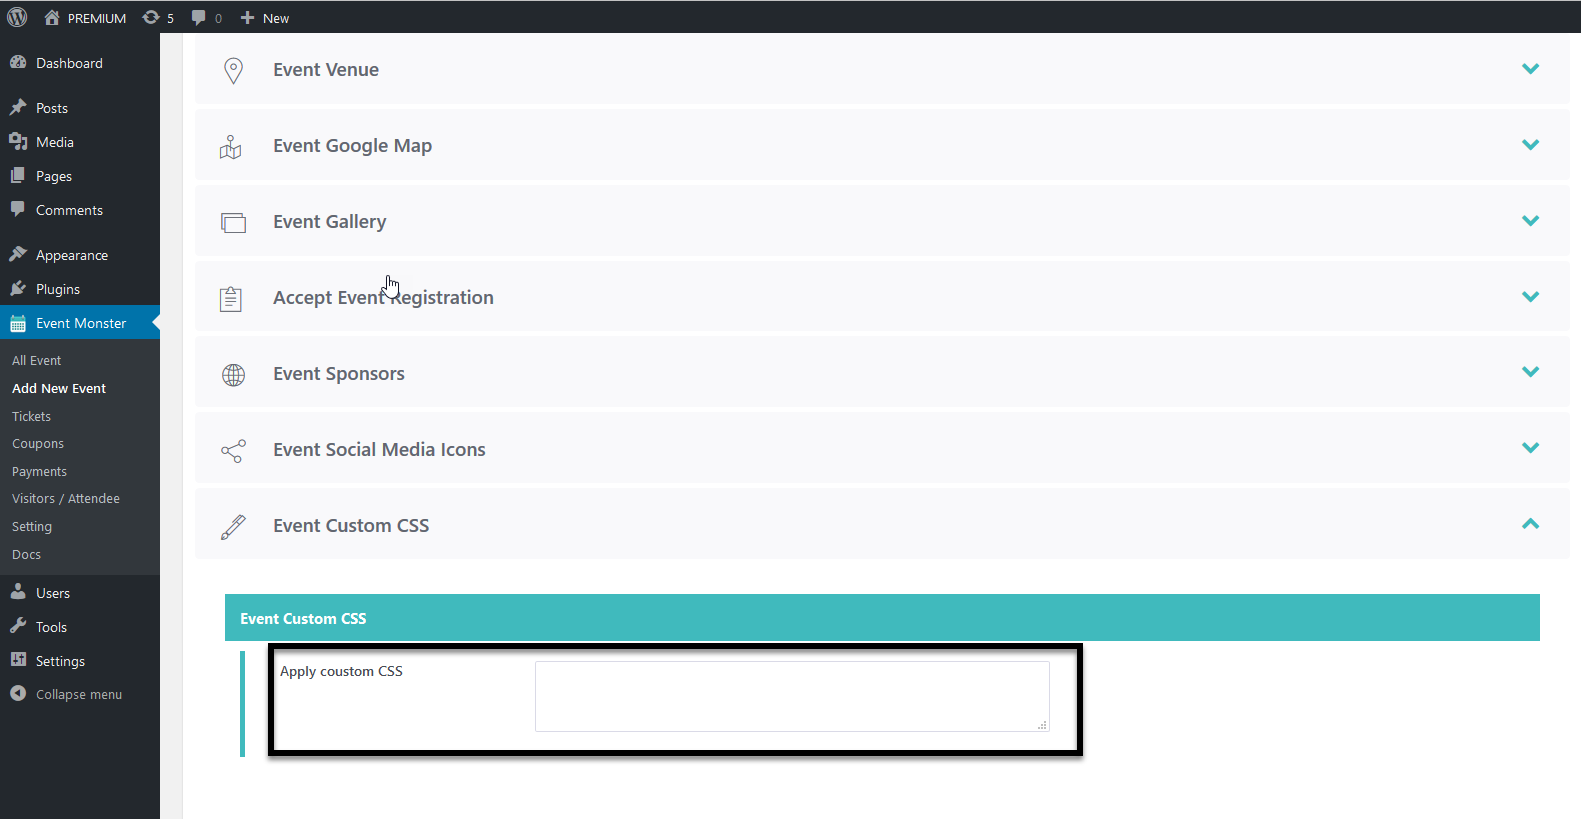
- If you wanna Appy your own CSS in this plugin then type CSS here.
8.Add Event On Page & Post
Copy The Event Shortcode
- Go to event settings page.
- A. Publish your event with the default setting.
- B. Click on “GET EVENT SHORTCODE ” button.
- Now copy the shortcode, and paste where you want to show the Event any Page or post.
- A. Copy ” [EM] ” if you wanna show multi event or event list in single page.
- B. Copy ” [EM id=31] ” if you wanna show single event single page.
Add Event on page
- Go to the pages from the admin menu bar.
- A. Click on add new page.
- B. Add the page title.
- C. Paste the shortcode into the body.
- D. Click the publish button. (that’s all).
Add Event In Post
- Go to the Posts from the admin menu bar.
- Click on any post where you want to add Event.
- A. Paste the shortcode into the body.
- B. Click the publish button. (that’s all).
9.Event Preview
Single Event Preview On Page
Multi Event Or Event List Preview
Preview With Cancel Event
Preview In Post
10.Payments
- A. Click on ‘Payments’ menu from the admin menu bar.
- B. Select the event which you want to see payments, then you will see all the records related to the selected event.
- C. You can also download records list related to the selected event.
11.Visitors / Attendees
- A. Click on ‘Visitors/Attendees’ menu from the admin menu bar.
- B. Select the event which you want to see visitors/attendees, then you will see all the records related to the selected event.
- C. You can also download records list related to the selected event.
12.Booking Cancellation
How To Cancel Booking?
- A. First, go to the visitor/attendee table, you can cancel any booking from the table.
- B. click on the edit button in the status field. for cancel booking.
- Now you will see a select box, please select “canceled”, and the client will receive a booking cancellation email that you have set in common settings.
13.Event Cancellation
How To Cancel Event?
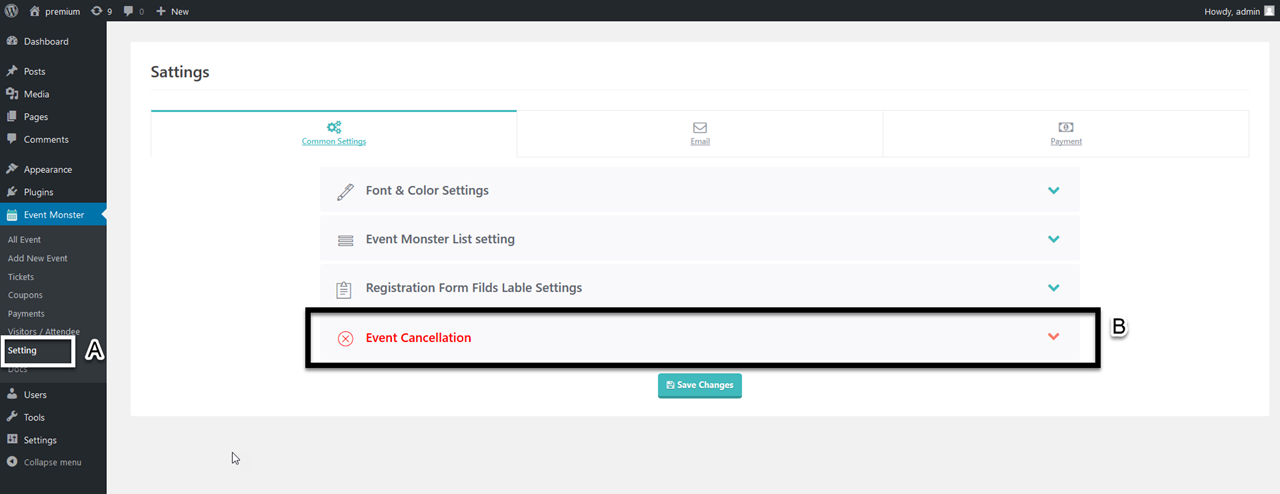
- A. first, go to the “settings” page from the admin menu.
- Then you can see in common setting tab a red color text bar.
- B. Click on that red color text bar that is event cancellation feature.
Now you can see some settings for event cancellation.
- A. Set On / Off auto notification of “Event Cancellation Email” for the client.
- B. Type email subject for the “Event Cancellation Email” of the auto notification email.
- C. Type email message/reason for the “Event Cancellation Email” of the auto notification email.
- D. Select any event name for cancellation.
- E. press this big red button for cancel event.
- F. after all this please please click on save button for save this cancellation.
Preview With Cancel Event


