Aneeq Premium customizer
Table of Contents
1.Download Theme
- First of All, Download “Aneeq” Premium Theme.
- If you do not download yet (click here) to log in your account and download “Aneeq” Premium Theme.
2.How to Install & Setup a WordPress Theme
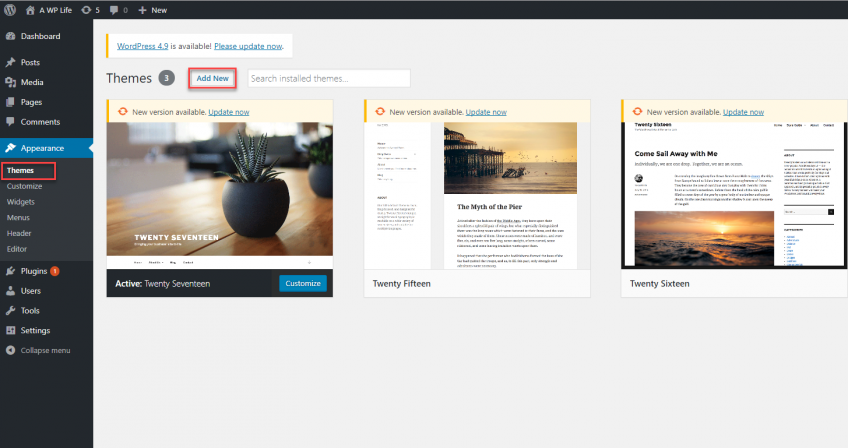
Log into your WordPress website and browse to Appearance > Themes
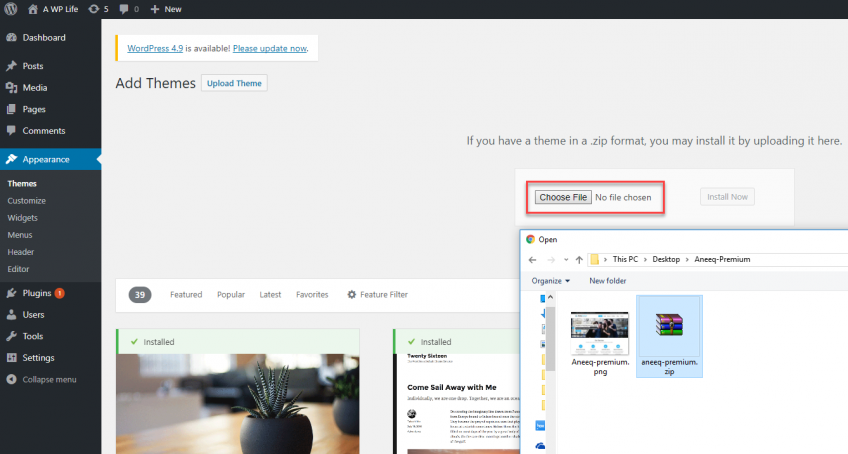
Then click on the option to upload theme.
Next Choose for the Aneeq Premium zipped theme file you downloaded from A WP Life and Install
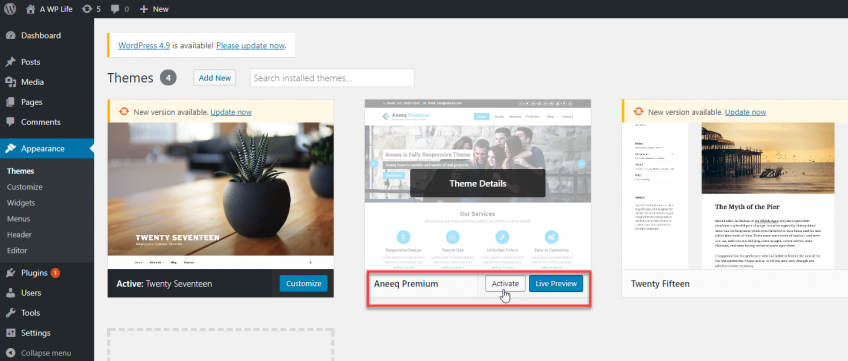
Once WordPress has unpacked and installed the theme,
Go To WordPress site Appearance > Themes and activate Aneeq Premium Theme.
“Aneeq” Theme Preview
3.Menu Setup
4.Slider Settings
Go to Dashboard >> Appearance >> Customize >> Aneeq Homepage Sections >> Slider.
Slider Options:
- Autoplay Slider : This option allows to turn on and off the slider auto play on the homepage.
- Pause On Hover : You can turn on and off the pause on hover in the slider.
- Slide Show Delay: You can Set the slide show delay time between the slides.
- Slider Overlay Color : You Can Set the overlay color for slider.
- Slider Overlay Opacity : You Can Set the slider overlay opacity.
- Slide Title : You Can Set the color for slide title.
- Slide Description: You Can set the color for slide description.
- Slide Content Background: You Can Set the background color for slide content box.
- Slide Content Background Opacity: You can Set the background color opacity for slide content box.
- Slider Caption Alignment: You Can Select the position of slider caption alignment (Left, Center, Right).
5.Service Settings
Go to Dashboard >> Appearance >> Customize >> Aneeq Homepage Sections >> Service.
Service Options:
- Service Section Heading: Enter the heading title for the service section.
- Service Section Description: Enter the description for service section..
- Service Items Content: It will allow you to add the service content like Icon, Title, Description and Service Link, etc.
- Service Column Layout: You can show the service items in 2, 3 and 4 column layout.
6.Fun-Facts Settings
Go to Dashboard >> Appearance >> Customize >> Aneeq Homepage Sections >> Fun Facts.
FunFacts Options:
- Fun Facts Section Heading – Enter the heading title for the fun facts section. (For front page only).
- Fun Facts Section Description: Enter the description for fun facts section.
- Fun fact content: Add your Title, Fact Value, and Icon.
- Column Layout: You can show the project items in 2, 3 and 4 columns.
- Fun Facts Icon Color: Select the color for icon .
- Fun Facts Value Color: Select the color for fact value.
- Fun Facts Title Color: Select the color for fact title
7.Portfolio Settings
Go to Dashboard >> Appearance >> Customize >> Aneeq Homepage Sections >> Portfolio
Portfolio Options :
- Portfolio Section Heading : Set the portfolio section heading title.
- Portfolio Section Description : Set the portfolio section description.
- Columns Layout : You can show the project items in 2, 3 and 4 columns.
- Recent Portfolio Item Limit : Select the number of recent portfolio work for portfolio section on frontpage.
Portfolio Layout First
Portfolio Layout Two
8.Testimonials Settings
Go to Dashboard >> Appearance >> Customize >> Aneeq Homepage Sections >> Testimonial.
Testimonial Options:
- : Enter the heading title for the testimonial section.
- Description: Enter the Description of the Testimonial Section.
- Testimonial Items content: Add your Title, Description, Link, Image, Designation.
9.Blog Settings
Go to Dashboard >> Appearance >> Customize >> Aneeq Homepage Sections >> Blog.
Blog Options:
- Title : Enter the heading title for the blog section. (For front page only)
- Description : Enter the description for blog section.
- Recent Blog Posts : Set the slide show delay time between the slides.
- Post Share Buttons : Select to show/hide the post share button on single post page.(Single Post).
10.Team Member Settings
Go to Dashboard >> Appearance >> Customize >> Aneeq Homepage Sections >> Team Member.
Team Options:
- Title – Enter the heading title for the Team Member section. (For front page only).
- Description: Enter the description for Team Member section.
- Team Items content: Add your Title, Description, Link, Image, Social Icons.
- Column Layout: Drag the slider to change the column layout of team member section.
11.Call-Out Area Settings
Go to Dashboard >> Appearance >> Customize >> Aneeq Homepage Sections >> Callout.
Callout Options:
- Title: Enter the callout area title text..
- Description: Enter the callout area description text.
- Button Text: Enter the callout area button text.
- Button Link: Enter callout area button link.
12.Our Client Settings
Go to Dashboard >> Appearance >> Customize >> Aneeq Homepage Sections >> Client.
Client Settings:
- Title: Enter the heading title for the Client section. (For front page only).
- Description: Enter the description for Client section.
- Autoplay: Select to turn on or off the portfolio autoplay.
- Client Items content: Add your Link, Image.
13.Footer Settings


