

What is search engine indexing?
Search engine indexing is the process by which search engines, such as Google, Bing, or Yahoo, discover and add web pages to their databases. These databases are then used to power search results when a user enters a query into the search engine.
When a search engine crawls the web, it follows links from one page to another and indexes the content on each page it encounters. As it indexes a page, it processes the content to understand what the page is about and how it should be ranked in search results. This process is known as “indexing” or “crawling and indexing“.
When a search engine indexes a page, it looks at various factors such as the text on the page, the images and videos on the page, the structure of the HTML code, and the links pointing to the page. It uses this information to determine the relevance and authority of the page, and how it should be ranked in search results.
Search engine indexing is an ongoing process, as search engines constantly update their databases to ensure that they have the most up-to-date information. This is important as the web is constantly changing, with new pages being created and old pages being updated or removed.
One key factor to improve your website ranking on search engine results is to optimize your pages for search engines through techniques called Search Engine Optimization (SEO). By optimizing your pages for search engines, you can increase the likelihood that your pages will be indexed and rank higher in search results.
Why stop search engines from crawling a WordPress website?
There may be several reasons why someone would want to stop search engines from crawling a WordPress site. Here are a few possible reasons:
- Development and testing: If a website is under development or undergoing testing, it may not be ready for public consumption. In this case, the site owner may want to prevent search engines from crawling the site until it is ready to be launched.
- Privacy and security: Some websites may contain sensitive information that should not be publicly accessible. In this case, the site owner may want to prevent search engines from crawling the site to protect the privacy and security of the information.
- Traffic management: Some websites may have a limited amount of resources available, such as bandwidth or server capacity. In this case, the site owner may want to prevent search engines from crawling the site to conserve resources and manage traffic.
- Duplicate content: If a website is running on multiple domains, it could cause duplicate content issues, which can negatively impact search engine optimization. In this case, the site owner may want to prevent search engines from crawling the duplicate site to avoid this problem.
- Maintenance mode: When performing maintenance on a website, site owners may want to prevent search engines from crawling the site to avoid returning a 404 error to visitors.
- Staging Site: If a site owner wants to test new changes or updates on a staging site before publishing the changes to the live site, they may want to prevent search engines from crawling the staging site to avoid any confusion or issues with their live site’s search engine ranking.
It’s worth noting that while it’s possible to prevent search engines from crawling a WordPress site, it’s not recommended to do so for a long period of time. Search engine visibility is important for driving traffic to a site and keeping it updated through indexing is crucial for search engine optimization.
Ways to stop search engines from crawling a WordPress website
There are several methods that can be used to stop search engines from crawling a WordPress site:
- Using a plugin: There are several WordPress plugins, such as Yoast SEO or All in One SEO Pack, that allow you to add a “noindex” meta tag to your pages. This tells search engines not to index the page, effectively preventing them from crawling the site.
- Using the robots.txt file: The robots.txt file is a file that sits on the root of a website and tells search engines which pages or sections of the site they should not crawl. You can use the robots.txt file to block search engines from crawling your entire site, or just specific pages or sections.
- Using the .htaccess file: The .htaccess file is a configuration file for the Apache web server, which is used by many hosting providers. You can use the .htaccess file to block search engines from crawling your site by adding a few lines of code.
- Password protection: Password protecting your site using a plugin or your hosting provider’s built-in feature can also prevent search engines from crawling your site, as they will not be able to access the protected pages.
- Maintenance mode: WordPress has built-in maintenance mode feature that can be activated via the wp-config.php file. This will show a maintenance page to visitors and prevent search engines from crawling the site during maintenance.
- Staging site: Many hosting providers offer a staging feature, which allows you to create a copy of your live site for testing and development. Search engines will not be able to crawl the staging site, as it is typically blocked from being indexed.
Let’s have a look at all the methods with some more details.
#1. Using a plugin
Using a plugin to stop search engines from crawling a WordPress site is a popular method, as it is relatively easy to set up and does not require any technical knowledge. There are several WordPress plugins available that allow you to add a “noindex” meta tag to your pages, such as Yoast SEO or All in One SEO Pack.
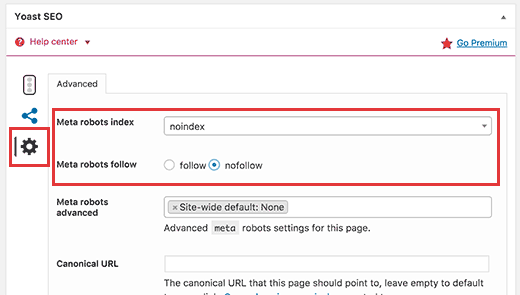
When you use a plugin to add a “noindex” meta tag, it tells search engines not to index the page, effectively preventing them from crawling the site. This means that the page will not appear in search engine results, and the search engine will not spend resources on crawling the page.
To use a plugin to stop search engines from crawling a WordPress site, you will first need to install and activate the plugin. Once the plugin is activated, you will typically be able to access the plugin’s settings from the WordPress dashboard. From there, you can select the pages or posts that you want to prevent search engines from crawling and add the “noindex” meta tag to them.
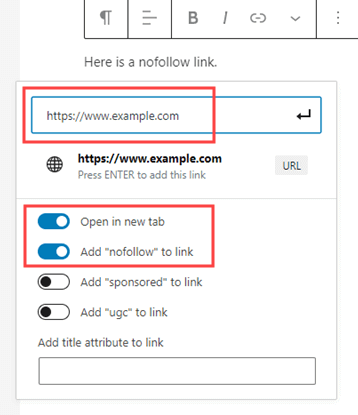
It’s worth noting that some plugins will also allow you to add “nofollow” meta tags, which tell search engines not to follow the links on the page. This can be useful if you want to prevent search engines from crawling your site, but still want to allow users to access the page.
Additionally, some plugins can also allow you to block search engines from crawling certain sections of your site, or the entire site, by adding the “noindex” meta tag to the appropriate sections or pages.
It’s important to remember that using a plugin to stop search engines from crawling a WordPress site is a temporary solution and should not be used for a long period of time as it will affect the visibility and traffic of the website. If you want to make changes in your website, you can use the maintenance mode or the staging site instead.
#2. Using the robots.txt file
Using the robots.txt file to stop search engines from crawling a WordPress site is a method that is based on the standard for web robots (also known as “crawlers” or “spiders”). The robots.txt file is a file that sits on the root of a website and tells search engines which pages or sections of the site they should not crawl. By creating and uploading a robots.txt file to your website, you can prevent search engines from crawling certain pages or sections of your site.
To create a robots.txt file, you can use a simple text editor like Notepad or TextEdit. The file should start with the user-agent line, which tells search engines which crawler should be blocked. For example, to block all search engines, you would use “User-agent: *”.
Next, you can specify which pages or sections of your site you want to block. This is done by using the “Disallow” directive, followed by the URL of the page or section you want to block. For example, to block a specific page, you would use “Disallow: /page-to-block/”. To block an entire directory, you would use “Disallow: /directory-to-block/”.
Once you have created the robots.txt file, you need to upload it to the root directory of your website. The location of the root directory will depend on your hosting provider, but it is typically the same directory as your homepage.
It’s worth noting that while a robots.txt file can prevent search engines from crawling your site, it is not a foolproof method, as some crawlers might ignore the file. Additionally, it’s important to remember that the robots.txt file will not prevent search engines from being aware of the site’s existence.
Also, keep in mind that if you’re blocking your entire site using robots.txt, it will prevent your site from being indexed and appearing in search engine results and thus your website won’t get any traffic from search engines.
It’s also worth noting that you can check the robots.txt file of any website by visiting the URL “https://www.example.com/robots.txt” and replace “example.com” with the domain name of any website.
#3. Using the .htaccess file
Using the .htaccess file to stop search engines from crawling a WordPress site is a method that involves editing the .htaccess file on your server to add specific rules that will block search engines from crawling certain pages or sections of your site. The .htaccess file is a configuration file that sits in the root directory of your website and controls various aspects of your website’s behavior, including redirects, security, and access controls.
Here’s an example of how you can use the .htaccess file to block search engines from crawling a specific page on your WordPress site:
- Access your website’s root directory through FTP or the file manager in your web hosting control panel.
- Look for the .htaccess file, if it doesn’t exist, you can create a new file with the same name.
- Open the .htaccess file in a text editor, such as Notepad or TextEdit.
- Add the following code at the end of the file:
<IfModule mod_rewrite.c>
RewriteEngine On
RewriteCond %{HTTP_USER_AGENT} (googlebot|bingbot|yahoo) [NC]
RewriteRule ^page-to-block/$ - [R=404,L]
</IfModule>
This code will block all major search engines from crawling the page with the URL “page-to-block”. You can change the URL to match the specific page you want to block.
- Save the .htaccess file and upload it back to your server.
It’s worth noting that this method will prevent search engines from crawling the specified pages, but it will not prevent search engines from being aware of the pages’ existence. Additionally, this method is based on the assumption that search engine crawlers will obey the rules specified in the .htaccess file, which may not always be the case.
Also, it’s important to be careful when editing the .htaccess file, as a mistake in the code can cause your website to become inaccessible. It’s recommended to keep a backup of the original .htaccess file before making any changes.
#4. Password protection
Using password protection to stop search engines from crawling a WordPress site is a method that involves adding a password to certain pages or sections of your site. This means that only users who have the password will be able to access the protected pages, while search engines will be unable to crawl them.
There are several ways to password protect pages or sections of a WordPress site:
- Using a plugin: There are several WordPress plugins available that allow you to password protect pages or sections of your site, such as Password Protected or Password Protected Categories. These plugins allow you to set a password for a specific page or post, or for an entire category.
- Using .htaccess file: You can use an .htaccess file to password protect a specific directory on your website. This method is a bit more technical, as it requires editing the .htaccess file on your server, but it can be useful if you want to password protect an entire directory, rather than just a single page or post.
- Using cPanel: Some web hosting providers also provide a way to password protect a directory in cPanel. This method can be useful if you want to password protect an entire directory and you are not familiar with .htaccess file editing.
Once you have password protected a page or section of your site, search engines will be unable to crawl it. However, it’s worth noting that this method will not prevent search engines from being aware of the page’s existence. Additionally, it’s important to remember that password protecting a page or section of your site will also prevent users from accessing it, so it should only be used for pages or sections that are not important for your site’s visibility or traffic.
Also, using password protection is not a long-term solution, you should use this method only if you have a temporary need to block access to your site or a specific part of it, such as during maintenance or testing.
#5. Maintenance mode
WordPress has a built-in maintenance mode feature that allows you to temporarily take your site offline while you perform updates, maintenance, or make changes. This feature is typically used to display a “Coming Soon” or “Maintenance Mode” page to visitors, while still allowing you and other logged-in users to access the site.
To activate the built-in maintenance mode in WordPress, you can follow these steps:
- Go to the WordPress dashboard and navigate to the “Settings” menu.
- Select the “Maintenance Mode” option.
- Check the “Enable Maintenance Mode” checkbox.
- Click the “Save Changes” button.
Once you have enabled the maintenance mode, visitors will see a “Coming Soon” or “Maintenance Mode” page, while you and other logged-in users will have full access to the site. This will also block search engines from crawling the site while it is in maintenance mode.
You can also install a plugin like “Coming Soon Page & Maintenance Mode by SeedProd” which allow you to customize the coming soon page and also allow you to block search engines from crawling the site while it is in maintenance mode.
#6 .Staging site
A staging site is a duplicate or replica of your live website that is used for testing and development purposes. It allows you to make changes and test new features on your site without affecting the live version. This can be very useful when you want to update your website or make major changes, but don’t want visitors or search engines to see the site while it’s in progress.
Many hosting providers offer a staging feature that allows you to create a copy of your live site with a few clicks. This typically involves creating a separate subdomain, or a subdirectory on your main domain, where you can access the staging site. The process of creating a staging site can vary depending on the hosting provider, but it usually involves a few simple steps like:
- Log in to your hosting account.
- Go to the hosting control panel or cPanel
- Look for the “Staging” or “Development” section.
- Select your website from the list of sites on your hosting account.
- Click the “Create Staging Site” button.
Once the staging site is created, you will be able to access it using a different URL than the live site, such as “staging.yourdomain.com”. You can then make changes and test new features on the staging site without affecting the live version.
It’s important to note that search engines will not be able to crawl the staging site, as it is typically blocked from being indexed. This means that the staging site will not be visible to the search engines and will not affect the live site’s SEO. You can also block search engines from crawling the site using the robots.txt file or by using a plugin to manage access to your site, like “Coming Soon Page & Maintenance Mode by SeedProd” or “WordPress SEO by Yoast”, so that the search engines can’t access the site while it’s in development.
Once you’re done making changes and testing on the staging site, you can then push the changes to the live site. This can be done by using the same plugin you used to create the staging site, or by manually uploading the changes to the live site.
A staging site is a replica of a live site, used to test and develop changes in a secure environment, it can be used to block search engines from crawling the site, and it allows you to test changes before making them live. And many hosting providers offer this feature as a built-in service.
Wrapping Up
In conclusion, there are several methods that can be used to stop search engines from crawling a WordPress site, each with its own advantages and limitations. These methods include using the built-in maintenance mode, robots.txt file, plugins, and creating a staging site. Each of these methods can be used to achieve different goals, such as protecting the privacy and security of sensitive information, managing traffic and resources, avoiding duplicate content issues, and testing new changes or updates before publishing them to the live site. It’s essential to choose the right method that best fits your needs and to make sure that your site is properly configured to prevent search engines from crawling it.
