As a WordPress user, it is important to have a backup of all your media assets in case of any unforeseen events that may lead to loss of data. Whether it’s due to a server malfunction or human error, it’s always a good idea to have a backup of your WordPress media library.
One of the easiest ways to create a backup of your media library is by downloading all your files onto your computer. This ensures that you have all your media assets in one place and can be easily restored to your WordPress site should the need arise. Additionally, if you have more than one WordPress site, you can easily transfer media assets from one site to another.
In this article, we’ll guide you through the process of quickly downloading your full WordPress media library.
What could be the need to download the Media Library?
All of the media files that you have added to your site are kept in the WordPress media library. By downloading a copy of the media library and putting it on your computer, you can quickly make a backup of these media files if you wish to.
To backup your complete WordPress site, you may always employ a fully automated WordPress backup service (including plugins, themes, posts, and the media library). On the other hand, the majority of backup plugins do not provide a simple method for downloading and uploading your media library.
The media library might also be downloaded via FTP or the file manager in your WordPress hosting account, although both processes are a little challenging and complex for new users. Having said that, we’ll go through some simple steps for downloading your full WordPress media collection.
Step 1. Using the Export Media Library Plugin To Download A Media Library
Step 2: Download the Media Files and the Full WordPress
Step 3: Use WordPress settings to download the media library
Step 1. Using the Export Media Library Plugin To Download A Media Library
We’ll use a plugin to get the media files for this strategy. Installing and turning on the Export Media Library plugin is the first step.
Visit the Media » Export page from your admin area after activation.
Simply select the ‘Single folder with all files’ option from the dropdown menu next to the ‘Folder Structure’ option after you’ve arrived at the ‘Export Media Library’ page.
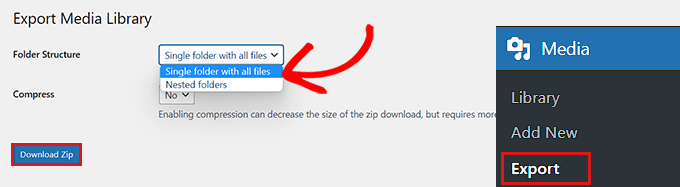
Your media has now been downloaded into a single folder. These will be downloaded in their original JPG, PNG, or SVG file formats.
Choose the “Nested Folder” option from the dropdown menu if you want your media to be organised into different folders according to the time it was uploaded.
After that, all of your media library’s content will be transferred to your computer as a zip file by simply clicking the “Download Zip” button.
Step 2: Download the Media Files and the Full WordPress
This solution is for you if you wish to back up your complete WordPress website, including the media library.
In order to build a comprehensive backup of your WordPress website, we’ll be utilising the Duplicator plugin, which is the finest backup plugin for WordPress currently available.
Installing and turning on the Duplicator plugin is the first step
After activation, you must click the “Create New” button on the Duplicator » Packages page in the admin sidebar.

The next step is to give your WordPress backup a name.
Once the backup has been downloaded to your computer, it can be anything that makes it easier for you to recognize it.
Click the “Next” button to proceed after that.

The next stage is checking your website for potential faults.
Simply click the “build” button to generate your package after the scan is finished.
Note: You must fix any errors that Duplicator highlights before running another scan and constructing your package.

After the package has been created, you must select the “Download Both Files” button.
The files for your installer and archive are now downloading simultaneously.

The media files from the backup of your WordPress website are currently being downloaded in your computer.
Step 3: Use WordPress settings to download the media library
This method demonstrates how to export your whole media library from the WordPress backend and import it into a different WordPress website.
Notably, you can obtain the media library using this method without the need for plugins. Nevertheless, because this method exports your media as an XML file, we do not suggest it.
If you wish to import your WordPress media library to one of your other websites, this method can be useful.
Visit the Tools » Export page from the WordPress admin dashboard to do that.
Simply check the box next to the ‘Media’ option now that you are on the ‘Export’ page.
You can choose a date range for a certain time period if you don’t want to download your complete library. Only the photos uploaded within the selected time period will be downloaded using this feature.
You can now download the export file by clicking “Download Export File”.

Your WordPress media library will now be saved as an XML file on your computer.
Installing and turning on the WordPress Importer plugin is the next step.
You can import your XML file to another WordPress website with this plugin.
In the admin sidebar, go to the Tools » Import page first.
Then you can just click the “Run Importer” link that is located beneath the “WordPress” option.

You need to click the “Select File” button on the “Import WordPress” page after doing this to proceed.
You can now upload an XML file from your computer’s media collection.

When you’re finished, don’t forget to upload the media library by selecting the ‘Upload file and import’ button.
Remember, creating a backup is only the first step in protecting your WordPress media library. Be sure to store your backup files in a secure location, and regularly update your backups to ensure that you have the latest version of your media assets. With a little bit of preparation and planning, you can safeguard your media library and ensure that your website is always up and running. Don’t wait until it’s too late; take action today and start backing up your media assets.
