
As more and more people embrace digitization and create websites for their businesses, there are a few essential elements that you must put first in order to ensure the success of your e-commerce store. A website stress test, often known as a load test, is one of these.
The days of having to pay large sums of money to developers to create websites are long gone. With WordPress page builders, almost anyone can create their own e-commerce store without any coding experience, simplifying the process.
That being said, it is always recommended to perform a website load test beforehand to ensure that everything is functioning properly on your website before going live.
What is a Stress Testing?
You may test the functionality of your WordPress website under heavy traffic conditions using a WordPress stress test.
The majority of speed test programs (such as PageSpeed Insights, WebPageTest, Pingdom, and GTmetrix) only evaluate the functionality of your website for a single user.
That information is still useful, but it doesn’t tell you anything about how well your website will function in a scenario with a lot of traffic.
What makes that an issue?
It’s possible that a lot of people visit your website generally. If so, evaluating your site with a single visit won’t truly tell you how well it will function for users. You can observe how your website performs in a more realistic scenario by doing stress tests.
Technically, you’re doing “load testing” as opposed to “stress testing” if you’re testing under typical traffic conditions.
Or perhaps you should get ready for your website to become “viral.” Perhaps your host functions well with average traffic, but you’re curious about what would happen if you made Reddit’s first page.
To prevent your site from crashing and losing out on traffic, you can replicate these kinds of viral scenarios with a WordPress stress test.
Prerequisites for WordPress Load Testing
WordPress stress or load testing involves sending “fake visitors” to your site, which might sometimes conflict with your hosting provider. You need to take some precautions in order to protect yourself from these kinds of annoyances.
A lot of hosting companies have packages that only permit a certain amount of visitors to your website; if that amount is surpassed, you will incur additional fees. Your website can occasionally be suspended if it receives this kind of unexpected traffic.
- Before conducting a stress test, review the terms and conditions of your hosting plan. Many of them track traffic to your website and have additional guidelines that must be followed under specific circumstances
- Load testing has the potential to crash your website or for it to become extremely slow and unresponsive due to managing several resources. Therefore, testing your website for load times before to going live is the recommended approach.
How to Use Loader.io to Stress Test WordPress
A great WordPress stress test tool is Loader.io, owned by SendGrid/Twilio. You can conduct massive tests (up to 10,000 customers per test) using its free plan. Unless you pay, the majority of alternative speed test programs only allow you to have 25–50 visitors at once.
For anyone looking to conduct a comprehensive WordPress stress test at a reasonable cost, we recommend starting here.
Here’s how to stress test a WordPress website using Loader.io.
Create a Free Account on Loader.io
To get started, go to the Loader.io website and register for a free account. Simply click the “Sign Up Now” button to get started.

You will then be able to see the tool’s several pricing tiers.
Please choose the “free” pricing plan.

Following that, you can enter your information to create a new account.
Loader.io requires the company name, email address, and password. Simply check the reCaptcha box after entering this data and click “Sign Up.”
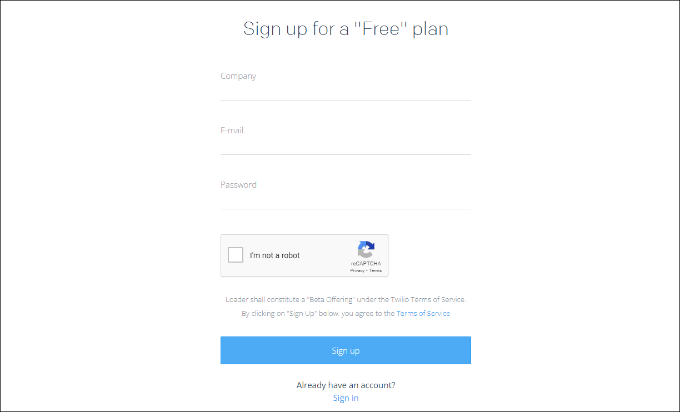
An email for verification was also sent to you. To verify your account, just check your mailbox and click the email link.
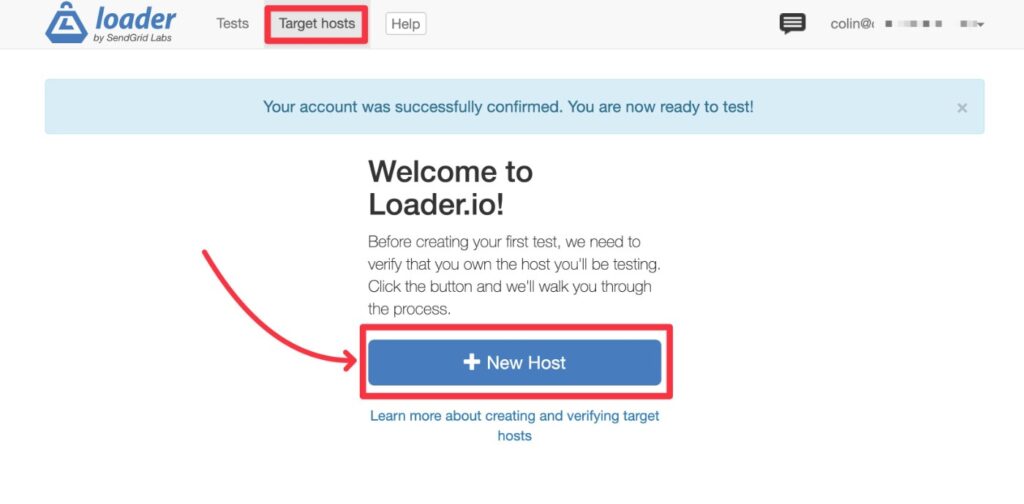
Adding a New Loader.io Host
After that, you can specify a target host by choosing the ‘+ New Host‘ button.
Press the “new host” button.
You must then type in your domain name. Once that’s done, simply click “Next: Verify.”

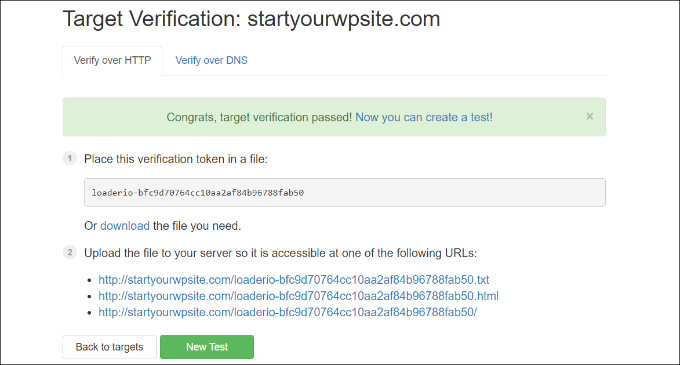
You must then validate your domain. For this, you can utilize HTTP or DNS verification..
In this tutorial, we will use the ‘Verify over HTTP’ option to download the verification file. The file will be saved to your computer as soon as you click the “download” link.

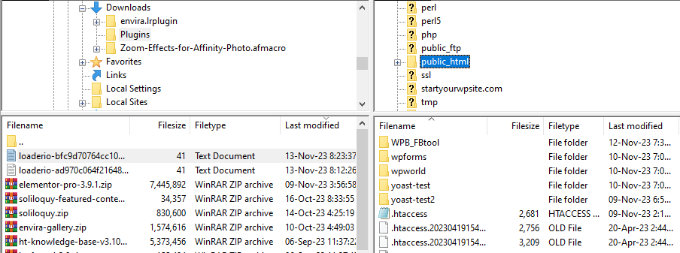
After downloading the file, you must upload it to your website’s root location.. Usually, this is referred to as the “public_html” subdirectory.
Use FileZilla or another FTP client of your choice to upload the file.
After uploading the file, you can return to the Loader.io website and choose the “Verify” option.
There should be a success message upon verification.
After that, you need to click the “New Test” button to start creating a stress test for your website.
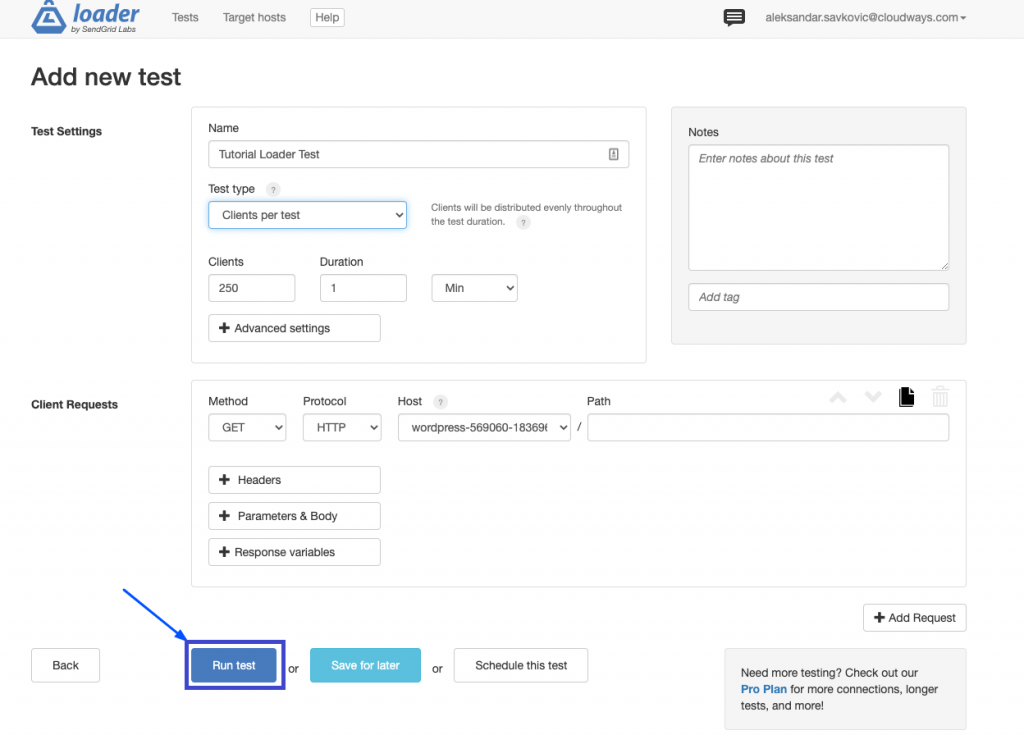
Create a test
You can alter the settings for your stress test on the next screen. You can start by giving your test a name.

The next step is to select the test type. On Loader.io, three test types are accessible and comprise:
Clients per test: This allows you to test how your website will perform when a specific number of visitors arrive and remain for a set amount of time. It is adjustable in terms of both length and quantity of clients.
Maintain client load: In this sort of test, the number of clients is kept constant throughout the whole test. It puts your website through stress testing over a set period of time with a steady load.
Clients requests per second: In this scenario, your website will be tested for a predetermined quantity of customer requests per second.
You will see the Client Requests options if you scroll down. It is not necessary to make any changes while utilizing the default settings for general testing.

Your WordPress website is now ready to undergo a stress test. Please press the “Run test” button.
Analyze Your Stress Test Results
Your website will undergo a stress test, and Loader.io will gather the results. After that, you can examine them to see how your website functions when there is a lot of traffic.
For example, you can begin by examining the average response time. The quicker your website loads, the smaller the reaction time.
The following image shows that when 250 clients visited the website for one minute, the average response time was 590 milliseconds or 0.59 seconds:
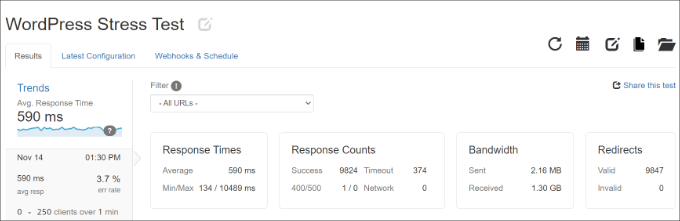
However, 10.489 seconds, or 10489 ms, was the greatest response time that was observed. Now you can notice when the response time jumps in relation to the amount of clients by looking at the graph below.

You can use these insights to get a general picture of how your website will function at a given visitor count.
This step can now be repeated in order to run additional tests in various situations. For example, experiment with raising the number of clients, varying the test types, and testing the time.
Wrapping Up
Our websites can only withstand so much stress before failing, just like humans can only withstand so much before losing it all.
So, be kind to your WordPress website and perform a load or stress test before going public to determine how much load your site can comfortably bear.
