Do you have problems uploading images to your WordPress website? Image upload errors can be quite confusing for beginners because they can appear without your doing anything different.
One of the most common issues with images in WordPress is the failure to upload them. There’s no need to worry because you can fix it yourself.
In this article, we will show you how to easily fix the WordPress image upload issue. You will also learn what causes this problem, and how to prevent it in the future.
What Causes The Image Upload Issue in WordPress
WordPress image upload issues are typically caused by incorrect file permissions. Your WordPress files are stored on your web hosting server and require specific file and directory permissions.
WordPress is unable to read or upload files on the hosting server because of incorrect file permissions. You may receive the following error when uploading an image:
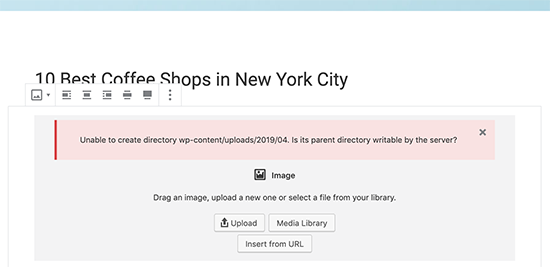
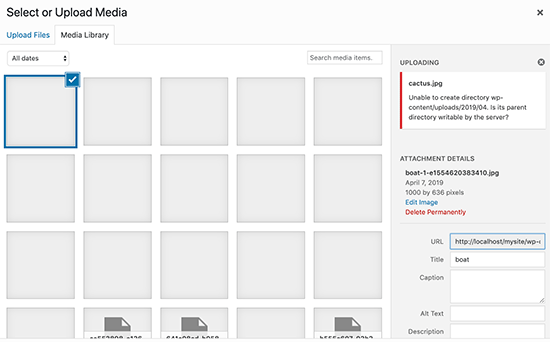
‘Unable to create directory wp-content/uploads/2019/04. Can the server read its parent directory?’
You might see the error “The uploaded file could not be moved to wp-content/uploads/”.
You may also see your images disappear from the media library as a sign of this issue.
My site was working fine before? Who changed the file permissions?
There are many reasons why this might happen. You may be able to change these permissions without doing anything if your shared hosting server has a misconfiguration.
Perhaps your web hosting provider performed an upgrade that changed file permissions unexpectedly.
If everything else on your website is working fine, then you can apply the correct file permissions to fix the image upload issue.
Let’s look at how to fix image upload issues on your WordPress site by setting the correct file permissions.
Fixing Image Upload Issue in WordPress
FTP clients are required to change file permissions.
Connect to your website via FTP and then navigate to the /wp-content/ folder. There, you’ll find the uploads folder, which is where WordPress stores all your media uploads, including images.
Choose File Permissions from the right-click menu of the uploads directory.
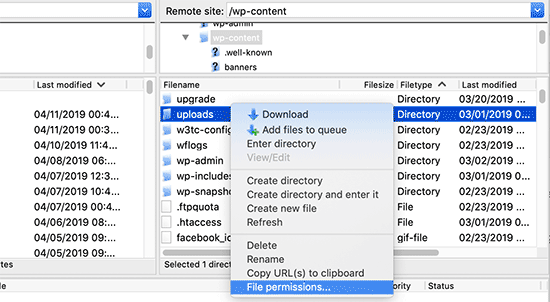
A dialog box with file permissions will appear.
As a first step, you need to set the permissions for the uploads directory and all subdirectories inside it to 744.
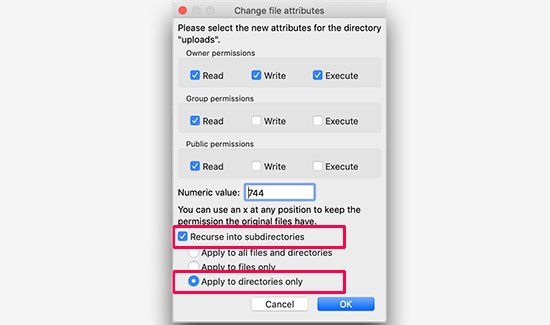
Please enter 744 in the numeric value box and then check the box next to Recurse into subdirectories. Select the ‘Apply to directories only’ radio button.
Click the OK button to apply these changes. The FTP client will now apply file permissions to the directories.
Note: If setting directory permissions to 744 do not seem to resolve your problem, try setting them to 755.
You will need to set file permissions for all the files in the uploads directory in the next step.
Choose file permissions by right-clicking on the uploads directory. Change the number 644 in the file permissions dialog box.
Recurse into subdirectories should be checked. Last but not least, you must select the ‘Apply to files only’ radio button. Click OK once you’ve finished.

Files inside the uploads folder will now have their permissions changed by the FTP client.
You can then go back to your WordPress admin area and upload images again.
You should also test any file upload forms on your website.
Note: You can also use the file manager provided by your WordPress hosting company if you do not know how to use an FTP client.
You will need to contact the host’s support to find instructions since screenshots will vary.
We hope now you are able to upload images in WordPress with the help of this article.
