
Creating custom taxonomies from WordPress categories is a powerful way to organize and classify your content more efficiently. While categories are great for broad grouping, custom taxonomies offer a more specific and tailored approach. They allow you to create unique structures that suit your website’s needs, providing users with an enhanced browsing experience.
Creating custom taxonomies from WordPress categories empowers you to organize your content in a more granular and meaningful way. By taking advantage of custom taxonomies, you can enhance your website’s navigation, improve user engagement, and ultimately deliver a more enjoyable and efficient user experience. So, roll up your sleeves and explore the world of custom taxonomies to take your WordPress website to the next level.
Understanding WordPress Taxonomies
In WordPress, taxonomies are a way to organize and classify content. They are used to group similar items together, making it easier for users to find and navigate content on a website. Taxonomies help create logical relationships between different pieces of content, enabling efficient content management and enhancing the user experience.
WordPress comes with two primary built-in taxonomies
Categories: Categories are a hierarchical taxonomy that allows you to group content into broad, predefined topics. They are usually used to organize blog posts and other types of content into main topics or sections. For example, a blog might have categories like “Technology,” “Travel,” “Food,” and “Lifestyle.” Within each category, you can have subcategories to further refine the organization.
Tags: Tags are a non-hierarchical taxonomy that provides a more flexible way to label and associate content. Unlike categories, tags are not organized into parent-child relationships. Instead, they represent specific keywords or labels that can be applied to content across different categories. Tags offer a way to associate related content, allowing users to discover articles or posts with similar themes or topics.
Besides these default taxonomies, WordPress also allows you to create custom taxonomies. Custom taxonomies enable you to create unique, user-defined classifications tailored to your website’s specific needs. For instance, if you are running a recipe website, you might create a custom taxonomy called “Cuisine,” which would allow you to categorize recipes by their country of origin.
Custom taxonomies give website owners and developers the flexibility to organize different content types, custom post types, or even media files according to their own structure. This customization helps improve the overall organization and searchability of content, making it more accessible and engaging for users.
When and Why Should Categories Be Transformed into Custom Taxonomies?
A taxonomy on your WordPress website serves as a powerful tool for organizing collections of posts and unique post types. By default, WordPress provides two pre-made taxonomies: categories and tags.
In addition to these default options, WordPress allows you to create custom taxonomies that can be used with existing or new post types. This flexibility enables you to tailor the organization of your content to better suit your site’s needs.
As your WordPress site grows, managing articles within categories that have numerous subcategories may become challenging. In such cases, converting your categories into a custom taxonomy can provide a more efficient and streamlined approach to content management.
Custom taxonomies offer enhanced precision and comprehensive classifications, making content management more effective. For example, on a recipe website, creating custom taxonomies for cuisine styles, dietary restrictions, and meal types can greatly improve the site’s organization and user experience.
However, you can simplify content organization by developing a unique taxonomy for each of these themes. By enabling you to employ more focused taxonomy terms, custom taxonomies can also aid in enhancing your SEO rankings. Beyond that, let’s see how you may quickly transform categories into unique taxonomies.
How to Change WordPress Categories to Custom Taxonomies
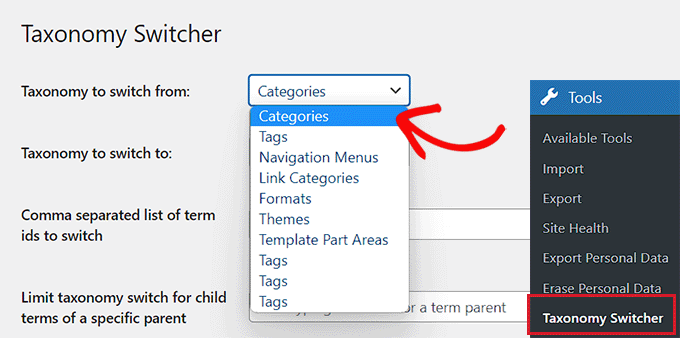
Installing and activating the Taxonomy Switcher plugin is the first step. To convert categories to unique taxonomies after activation, go to the Tools » Taxonomy Switcher page in the WordPress admin sidebar.
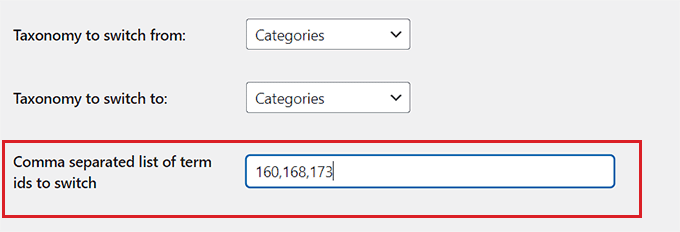
Once there, you must choose the ‘Categories’ option from the ‘Taxonomy to switch from’ dropdown menu. To put it another way, we will change a category into a unique taxonomy.
Next, choose the custom taxonomy from the dropdown menu under “Taxonomy to switch to” that you want the categories to become.
For instance, if you have a category for dietary restrictions and wish to convert to a taxonomy with the same name, you can select the ‘Dietary Restrictions’ option from the dropdown menu.
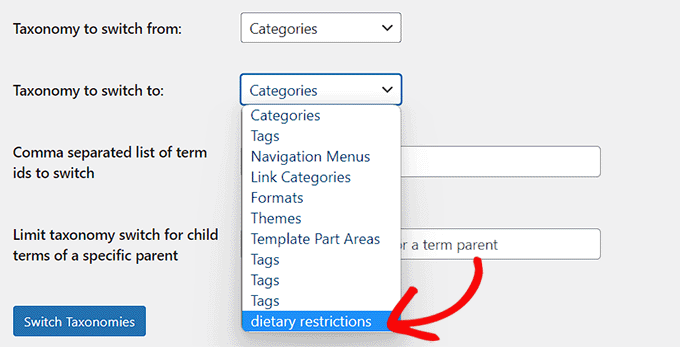
Simply click the ‘Switch Taxonomies’ button if you wish to move all of the categories on your WordPress site into this particular custom taxonomy.
If you only wish to convert a single or several categories into this taxonomy, enter their IDs in the ‘Comma separated list of term ids to switch’ area.

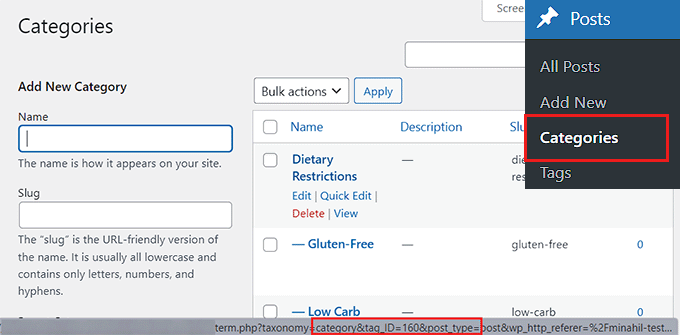
You must navigate to the Posts » Categories page from the WordPress dashboard and place your cursor over the category of your choice to discover the category id.
A popup box will now display in the bottom left corner of your screen with the category edit URL.
Your category ID may be found right here since it is the number that appears in the URL after “category&tag_ID=” and before “&post_type.”
Go back to the ‘Taxonomy Switcher’ page once you have located the category IDs.
Simply enter the IDs for each category that you wish to transform into a particular taxonomy after that. Remember that you must use commas to separate your category IDs if you add more than one.
WordPress categories can potentially contain child categories, known as subcategories.
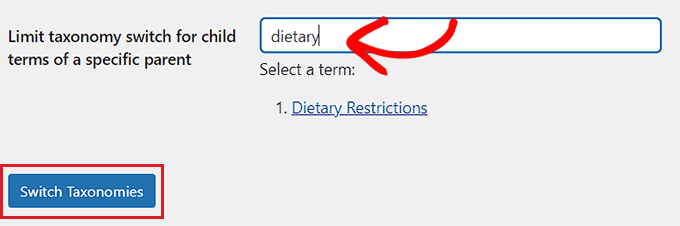
However, you can type the parent category next to the “Limit taxonomy switch for child terms of a specific parent” option if you want to skip the child categories. In this manner, a taxonomy will only be applied to the parent category.
Finally, switch your WordPress category to a custom taxonomy by clicking the “Switch Taxonomy” button.
The Posts menu tab in the WordPress sidebar now includes both the custom taxonomy you constructed and the standard taxonomies.
You will be moved to a new page after clicking on the custom taxonomy where you can quickly add terms for the taxonomy by filling in a name and slug.
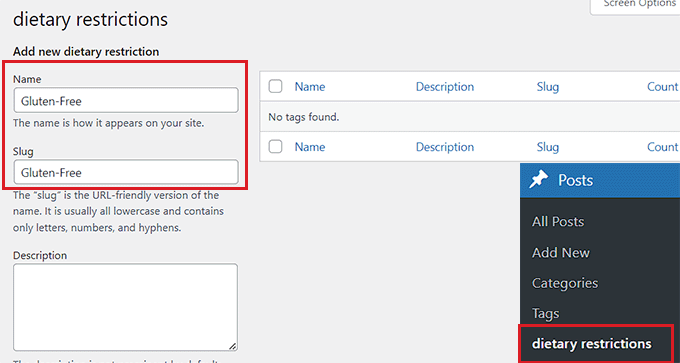
To add a new taxonomy term after completing that, simply click the “Add New” button at the bottom.
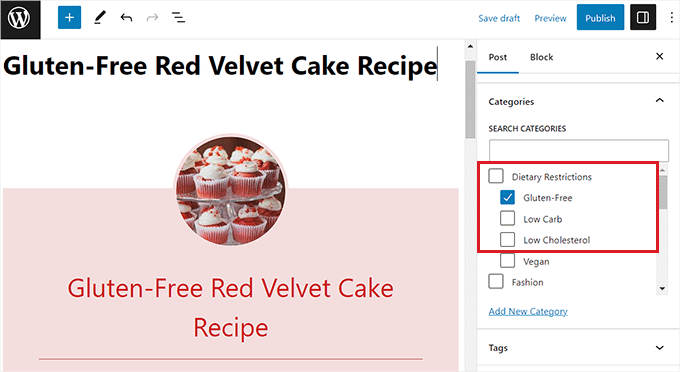
Now open a new or existing post or page in your WordPress block editor.
Here, you’ll see that the block panel in the right-hand corner of the screen is now showing the category to which you changed the taxonomy. From this point, adding new terms or making use of already-existing ones for your WordPress blog article is simple

How to Configure Category to Custom Taxonomy Redirects
When you convert one of your categories into a custom taxonomy, a 404 error will now appear on the category archive page. If your website is not yet live, there is no reason to be concerned about this.
However, if your website is currently operational, search engines may already have indexed and browsed your category pages. As a result, users who arrive via search engines may see those pages in the search results and a 404 error page.
Users must be redirected to the updated taxonomy pages for each category in order to fix issue.
You must install and activate the All in One SEO for WordPress plugin in order to accomplish this.
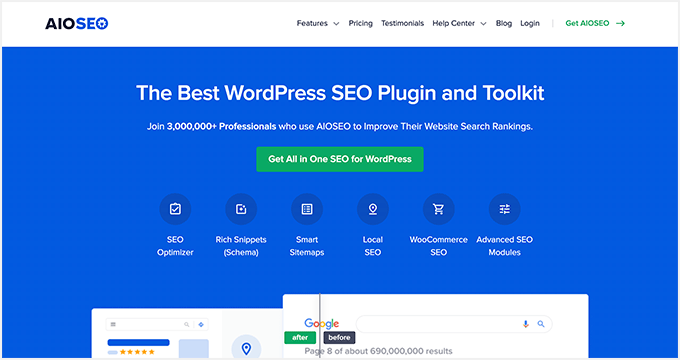
AIOSEO is the most effective WordPress SEO plugin available. It has an effective redirection manager add-on that makes it simple to locate broken links and fix them with 301 redirects.
After activation, you must set up AIOSEO on your website. Please see our setup instructions for All in One SEO for more complete instructions.
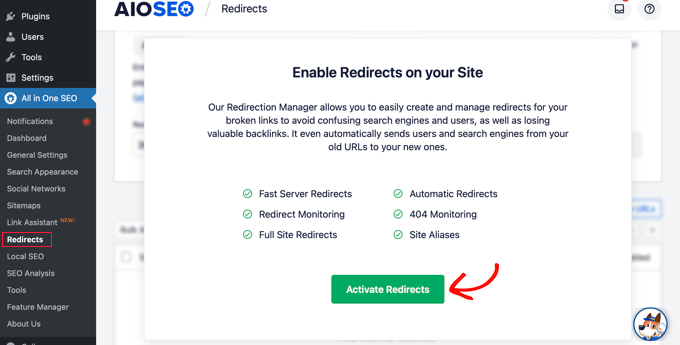
Go to the All in One SEO » Redirects page from the WordPress admin sidebar after you’ve finished that.
Activate the redirection manager by clicking the prompt that appears here. Click the ‘Activate Redirects’ button to proceed.
Your screen will now show the Redirects page.
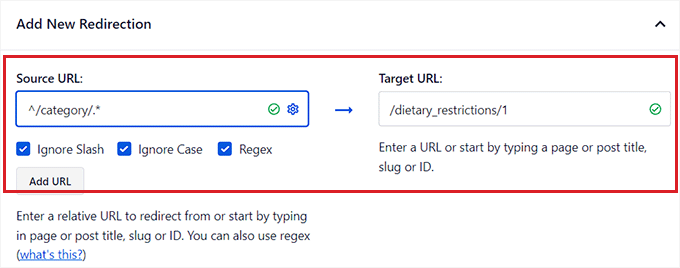
Simply enter /category/.* into the ‘Source URL’ field from here.
After doing that, open some more source URL options by clicking the gear icon in the box. Check the ‘Regex’ option from here.
Next, fill out the “Target URL” section with your unique taxonomy slug, such as /dietary_restrictions/1.
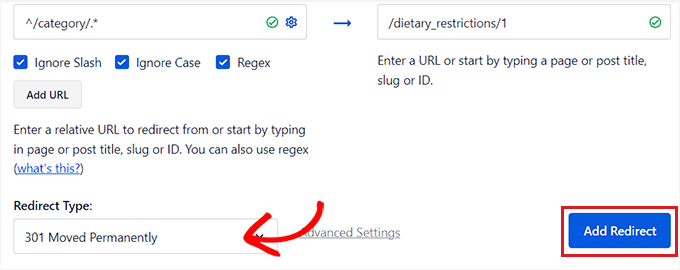
Next, check to see that the redirect option from the dropdown menu is set to ‘301 Moved Permanently’.
Then, press the ‘Add Redirect’ button located in the upper right corner.
The redirect you created will appear at the bottom of the page as soon as it is created.
If you wish to turn it off, you can always flick the switch to the “Inactive” position from here.
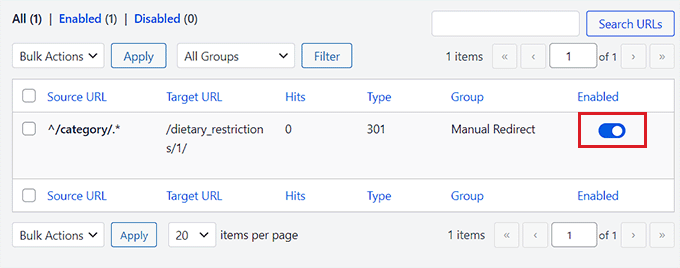
All traffic from your category archives will now be sent to your personal taxonomy.
Best Practices and Tips
Clear and Descriptive Naming: Choose names for your custom taxonomies that clearly describe their purpose and content. Avoid using vague or ambiguous terms.
Consistent Taxonomy Structure: Plan the structure of your custom taxonomies in a consistent and logical manner. A well-organized taxonomy makes it easier for users to find content.
Hierarchy Considerations: If you are creating hierarchical taxonomies, think carefully about the depth and nesting of terms. Don’t overcomplicate the hierarchy, as it may confuse users.
Keep Taxonomies Relevant: Avoid creating too many custom taxonomies or terms. Keep them relevant to the content of your website to maintain a clean and straightforward interface.
Test on Staging: Before implementing custom taxonomies on your live website, test them thoroughly on a staging environment. This helps identify and fix any issues before they affect your users.
Documentation for Users: Provide documentation or guidelines for other website administrators to understand the purpose and usage of custom taxonomies.
Translations for Multilingual Websites: If your website is multilingual, make sure to translate the custom taxonomy labels and terms to provide a seamless experience for international users.
Regular Maintenance: Periodically review your custom taxonomies to ensure they remain relevant. Remove any unused taxonomies or terms to avoid clutter in the backend.
Backup Before Changes: Always back up your website before making significant changes to your taxonomies. This ensures you can restore your website in case of any unexpected issues.
Avoid Plugin Overload: While plugins can extend functionality, try to limit the number of taxonomy-related plugins. Rely on custom code when possible to maintain performance and security.
SEO Optimization: Consider the impact of your custom taxonomies on SEO. Use appropriate keywords and descriptions for taxonomy terms to improve search engine visibility.
Be Careful with Rewrite Rules: If you modify the rewrite rules for your custom taxonomies, test thoroughly to avoid conflicts with existing content or other plugins.
Keep Track of Changes: If your website allows user-generated content, monitor the addition of new terms to ensure they fit within your taxonomy structure.
Stay Updated: Keep your WordPress core, plugins, and themes up-to-date to ensure compatibility and security.
Wrapping Up
Custom taxonomies offer more precise and comprehensive classifications, making content management and SEO optimization more efficient. As your WordPress site grows, converting categories into custom taxonomies can simplify content organization and enhance user experience.
To accomplish this transformation, we used the Taxonomy Switcher plugin. By selecting the categories and the custom taxonomy of our choice, we seamlessly switched WordPress categories to unique taxonomies. Additionally, we learned how to handle subcategories and how to manage redirects to ensure a smooth transition for users and search engines.
With the All in One SEO plugin’s redirection manager add-on, we efficiently managed broken links and implemented 301 redirects to guide users from the old category archives to the updated taxonomy pages.
By understanding and utilizing custom taxonomies effectively, WordPress users can optimize their content organization, improve SEO rankings, and provide a better experience for their audience.
